
Tiramisu Brownies: Prepare to have your dessert world rocked! Imagine the rich, fudgy goodness of a classic brownie swirled together with the creamy, coffee-infused magic of tiramisu. Yes, you read that right! This isn’t just another brownie recipe; it’s a decadent fusion that will leave you craving more.
While tiramisu itself boasts a delightful history rooted in the Veneto region of Italy, often playfully translated as “pick me up,” these brownies are a modern twist on a beloved classic. The original tiramisu, with its layers of coffee-soaked ladyfingers, mascarpone cream, and cocoa powder, has captivated hearts (and taste buds) worldwide for generations. We’ve taken that same spirit of indulgence and transformed it into an easy-to-make treat that’s perfect for any occasion.
People adore tiramisu for its complex yet comforting flavors and its luxuriously smooth texture. These Tiramisu Brownies capture that essence perfectly. The bitterness of the coffee beautifully complements the sweetness of the chocolate, creating a harmonious balance that’s simply irresistible. Plus, the fudgy brownie base adds a satisfying chewiness that elevates the entire experience. Whether you’re a seasoned baker or just starting out, this recipe is sure to impress. Get ready to experience the best of both worlds in every single bite!

Ingredients:
- For the Brownie Layer:
- 1 cup (2 sticks) unsalted butter, melted
- 2 cups granulated sugar
- 4 large eggs
- 1 teaspoon vanilla extract
- 1 cup all-purpose flour
- ¾ cup unsweetened cocoa powder
- ¼ teaspoon salt
- ½ cup chocolate chips (optional)
- For the Mascarpone Layer:
- 8 ounces mascarpone cheese, softened
- ½ cup powdered sugar
- 1 teaspoon vanilla extract
- 2 tablespoons heavy cream
- For the Coffee Syrup:
- ½ cup strong brewed coffee, cooled
- 2 tablespoons coffee liqueur (such as Kahlua) or more coffee
- For Assembly:
- Ladyfingers (about 12-15, depending on size), broken into smaller pieces
- Cocoa powder, for dusting
Preparing the Brownie Batter
- Melt the Butter: Start by melting the butter in a large, microwave-safe bowl or in a saucepan over low heat. Make sure it’s completely melted but not browned. Let it cool slightly before proceeding. This is crucial because hot butter can cook the eggs when you add them.
- Combine Butter and Sugar: Add the granulated sugar to the melted butter and whisk them together vigorously until the mixture is smooth and well combined. This step is important for creating a fudgy texture in your brownies. The sugar should dissolve into the butter as much as possible.
- Incorporate the Eggs: Add the eggs one at a time, whisking well after each addition. This ensures that each egg is fully incorporated into the batter, contributing to the richness and structure of the brownies. Don’t over-whisk at this stage, just make sure each egg is blended in.
- Add Vanilla Extract: Stir in the vanilla extract. Vanilla enhances the overall flavor profile of the brownies, adding a touch of warmth and complexity.
- Combine Dry Ingredients: In a separate bowl, whisk together the all-purpose flour, unsweetened cocoa powder, and salt. Whisking ensures that the cocoa powder is evenly distributed and prevents any lumps from forming in the batter.
- Gradually Add Dry Ingredients to Wet Ingredients: Gradually add the dry ingredients to the wet ingredients, mixing until just combined. Be careful not to overmix the batter, as this can lead to tough brownies. A few streaks of flour are okay at this point.
- Fold in Chocolate Chips (Optional): If you’re using chocolate chips, gently fold them into the batter. This adds extra chocolatey goodness and a delightful texture to the brownies.
Baking the Brownie Layer
- Prepare the Baking Pan: Preheat your oven to 350°F (175°C). Grease and flour an 8×8 inch baking pan. Alternatively, you can line the pan with parchment paper, leaving an overhang on the sides for easy removal of the brownies after baking.
- Pour Batter into Pan: Pour the brownie batter into the prepared baking pan and spread it evenly.
- Bake the Brownies: Bake for 25-30 minutes, or until a toothpick inserted into the center comes out with moist crumbs attached. The baking time may vary depending on your oven, so keep an eye on the brownies.
- Cool Completely: Let the brownies cool completely in the pan before adding the mascarpone layer. This is important because the heat from the brownies can melt the mascarpone and make the layers runny.
Preparing the Mascarpone Layer
- Soften the Mascarpone Cheese: Make sure your mascarpone cheese is softened to room temperature. This will make it easier to mix and create a smooth, creamy layer.
- Combine Mascarpone and Powdered Sugar: In a medium bowl, beat the softened mascarpone cheese and powdered sugar together until smooth and creamy. The powdered sugar adds sweetness and helps to stabilize the mascarpone.
- Add Vanilla Extract and Heavy Cream: Stir in the vanilla extract and heavy cream. The heavy cream helps to lighten the mascarpone mixture and make it more spreadable. Mix until everything is well combined and the mixture is smooth. Be careful not to overmix, as this can cause the mascarpone to become grainy.
Preparing the Coffee Syrup
- Brew Strong Coffee: Brew a strong cup of coffee. You can use espresso or regular coffee, but make sure it’s strong to give the brownies a good coffee flavor.
- Cool the Coffee: Let the coffee cool completely. Hot coffee can melt the mascarpone layer.
- Add Coffee Liqueur (Optional): Stir in the coffee liqueur (such as Kahlua) or more coffee. The coffee liqueur enhances the coffee flavor and adds a touch of boozy warmth. If you prefer a non-alcoholic version, simply use more coffee.
Assembling the Tiramisu Brownies
- Spread Mascarpone Layer: Once the brownie layer has cooled completely, spread the mascarpone mixture evenly over the top.
- Dip Ladyfingers in Coffee Syrup: Dip the broken ladyfinger pieces into the cooled coffee syrup for a few seconds on each side. Be careful not to soak them for too long, as they can become soggy. You want them to be moist but not falling apart.
- Arrange Ladyfingers on Mascarpone Layer: Arrange the coffee-soaked ladyfinger pieces over the mascarpone layer. You can create a single layer or overlap them slightly for a more rustic look.
- Dust with Cocoa Powder: Dust the top of the brownies generously with cocoa powder. This adds a beautiful finishing touch and enhances the tiramisu flavor.
- Chill Before Serving: Cover the brownies and chill them in the refrigerator for at least 2 hours, or preferably overnight. This allows the flavors to meld together and the mascarpone layer to set properly.
- Cut and Serve: Cut the brownies into squares and serve chilled. Enjoy!
Tips for Success:
- Don’t Overbake the Brownies: Overbaked brownies will be dry and crumbly. Aim for a fudgy texture by removing them from the oven when a toothpick inserted into the center comes out with moist crumbs attached.
- Use High-Quality Cocoa Powder: The quality of your cocoa powder will significantly impact the flavor of the brownies. Use a good-quality unsweetened cocoa powder for the best results.
- Adjust Sweetness to Taste: If you prefer a less sweet brownie, you can reduce the amount of sugar in the brownie batter.
- Experiment with Flavors: Feel free to add other flavors to the brownie batter, such as chopped nuts, espresso powder, or a swirl of Nutella.
- Make Ahead: These brownies can be made ahead of time and stored in the refrigerator for up to 3 days.
- Freezing Instructions: You can also freeze the brownies for longer storage. Wrap them tightly in plastic wrap and then in aluminum foil. They can be frozen for up to 2 months. Thaw them in the refrigerator overnight before serving.
Variations:
- Espresso Brownies: Add 1-2 teaspoons of espresso powder to the brownie batter for a more intense coffee flavor.
- Nutella Swirl Brownies: Swirl a few tablespoons of Nutella into the brownie batter before baking for a hazelnut chocolate twist.
- Peanut Butter Brownies: Swirl a few tablespoons of peanut butter into the brownie batter before baking for a peanut butter chocolate combination.
- White Chocolate Mascarpone Layer: Use white chocolate instead of powdered sugar in the mascarpone layer for a sweeter and richer flavor.
- Irish Cream Coffee Syrup: Substitute the coffee liqueur with Irish cream liqueur for a different flavor profile.
Conclusion:
This isn’t just another brownie recipe; it’s a decadent fusion of two beloved desserts, and trust me, you absolutely need to experience these Tiramisu Brownies. The rich, fudgy brownie base, infused with the subtle bitterness of coffee, perfectly complements the creamy, mascarpone-infused topping dusted with cocoa. It’s a symphony of flavors and textures that will leave you craving more.
Why are these Tiramisu Brownies a must-try? Because they’re surprisingly easy to make, even for novice bakers. The recipe is straightforward, using readily available ingredients, and the results are simply spectacular. Imagine sinking your teeth into a dense, chocolatey brownie with a hint of coffee, followed by the smooth, velvety mascarpone cream. It’s an indulgence that’s worth every single calorie! Plus, they’re a guaranteed crowd-pleaser, perfect for parties, potlucks, or simply a special treat for yourself.
But the best part? The versatility! While the recipe as written is divine, there’s plenty of room for experimentation.
Serving Suggestions and Variations:
* Classic Presentation: Serve these brownies chilled, cut into squares, and dusted generously with cocoa powder. A dollop of whipped cream or a scoop of vanilla ice cream elevates the experience even further.
* Coffee Kick: For an even more intense coffee flavor, try adding a tablespoon of instant espresso powder to the brownie batter. You can also brush the cooled brownies with a coffee liqueur before adding the mascarpone topping.
* Chocolate Lover’s Dream: Incorporate chocolate chips (dark, milk, or white – your choice!) into the brownie batter for an extra layer of chocolatey goodness.
* Nutty Delight: Add chopped walnuts, pecans, or almonds to the brownie batter or sprinkle them on top of the mascarpone cream for a delightful crunch.
* Boozy Brownies: A splash of rum or brandy in the mascarpone cream adds a sophisticated touch. Just be mindful of the alcohol content if serving to children.
* Individual Desserts: Bake the brownie batter in muffin tins for individual portions, perfect for parties or portion control.
* Tiramisu Brownie Parfaits: Crumble the brownies and layer them with the mascarpone cream and a drizzle of coffee liqueur in parfait glasses for an elegant dessert.
Don’t be afraid to get creative and adapt the recipe to your own preferences. The possibilities are endless!
I truly believe that these Tiramisu Brownies will become a new favorite in your household. They’re the perfect balance of rich, decadent, and comforting, and they’re sure to impress anyone who tries them.
So, what are you waiting for? Gather your ingredients, preheat your oven, and get ready to embark on a baking adventure. I’m confident that you’ll love the results. And most importantly, I’d love to hear about your experience! Please, after you’ve made them, come back and share your thoughts, variations, and photos in the comments below. Let me know what you think, what you changed, and how much you enjoyed these delightful treats. Happy baking!
Tiramisu Brownies: The Ultimate Dessert Recipe
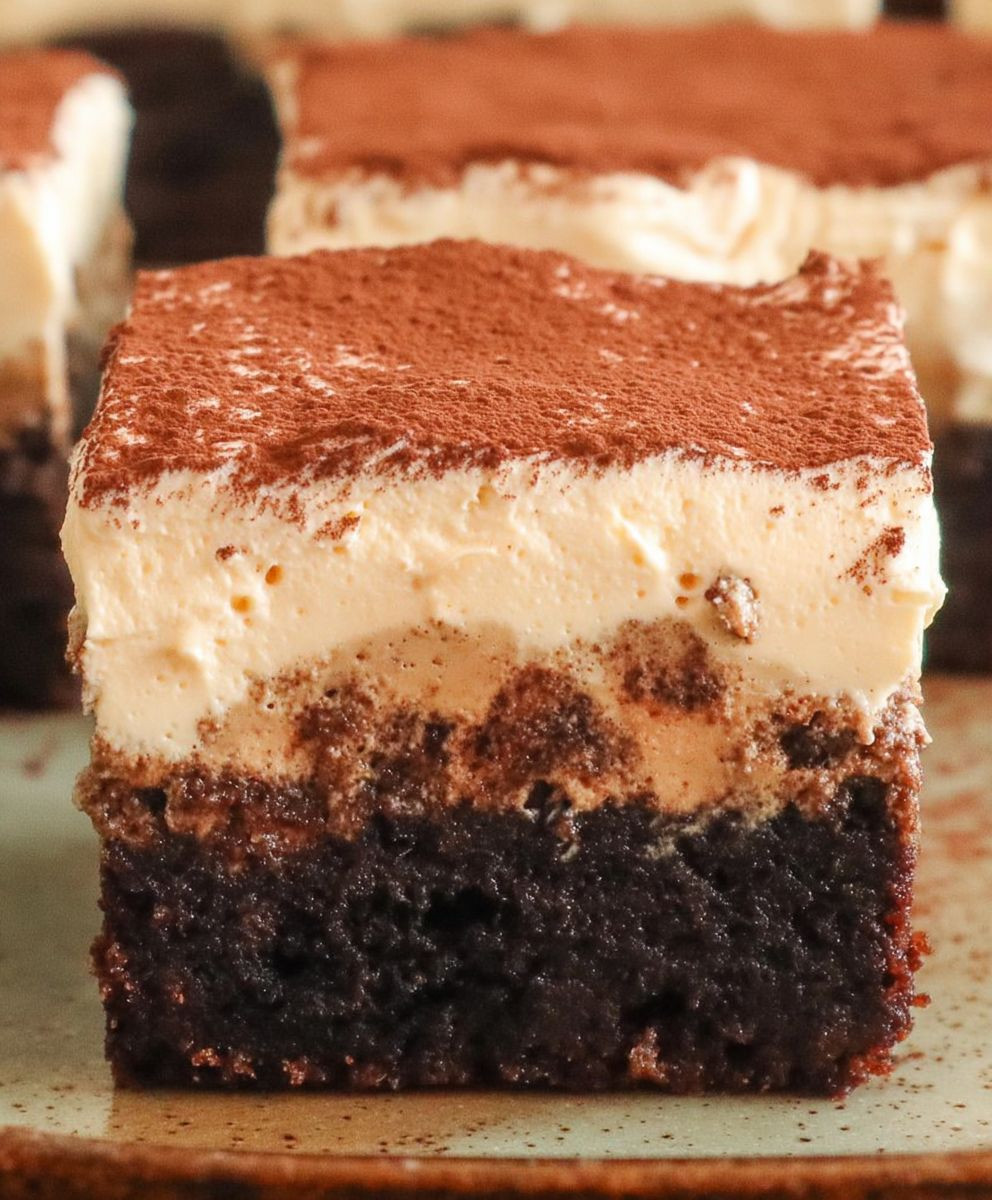
Fudgy chocolate brownies layered with creamy mascarpone, coffee-soaked ladyfingers, and a dusting of cocoa powder create a delightful Tiramisu-inspired treat.
Ingredients
- 1 cup (2 sticks) unsalted butter, melted
- 2 cups granulated sugar
- 4 large eggs
- 1 teaspoon vanilla extract
- 1 cup all-purpose flour
- ¾ cup unsweetened cocoa powder
- ¼ teaspoon salt
- ½ cup chocolate chips (optional)
- 8 ounces mascarpone cheese, softened
- ½ cup powdered sugar
- 1 teaspoon vanilla extract
- 2 tablespoons heavy cream
- ½ cup strong brewed coffee, cooled
- 2 tablespoons coffee liqueur (such as Kahlua) or more coffee
- Ladyfingers (about 12-15, depending on size), broken into smaller pieces
- Cocoa powder, for dusting
Instructions
- Prepare the Brownie Batter: Melt the butter in a large bowl. Add sugar and whisk until smooth. Incorporate eggs one at a time, then stir in vanilla. In a separate bowl, whisk together flour, cocoa powder, and salt. Gradually add dry ingredients to wet ingredients, mixing until just combined. Fold in chocolate chips (optional).
- Bake the Brownie Layer: Preheat oven to 350°F (175°C). Grease and flour an 8×8 inch baking pan. Pour batter into the pan and spread evenly. Bake for 25-30 minutes, or until a toothpick inserted into the center comes out with moist crumbs attached. Cool completely in the pan.
- Prepare the Mascarpone Layer: Beat softened mascarpone cheese and powdered sugar together until smooth. Stir in vanilla extract and heavy cream until well combined.
- Prepare the Coffee Syrup: Brew strong coffee and let it cool completely. Stir in coffee liqueur (optional).
- Assemble the Tiramisu Brownies: Spread the mascarpone mixture evenly over the cooled brownie layer. Dip ladyfinger pieces into the cooled coffee syrup for a few seconds on each side. Arrange the coffee-soaked ladyfingers on the mascarpone layer. Dust the top generously with cocoa powder.
- Chill Before Serving: Cover and chill in the refrigerator for at least 2 hours, or preferably overnight.
- Cut and Serve: Cut the brownies into squares and serve chilled.
Notes
- Don’t overbake the brownies for a fudgy texture.
- Use high-quality cocoa powder for the best flavor.
- Adjust sweetness to taste by reducing sugar in the brownie batter.
- Experiment with flavors like chopped nuts, espresso powder, or Nutella.
- These brownies can be made ahead and stored in the refrigerator for up to 3 days.
- For longer storage, freeze the brownies wrapped tightly in plastic wrap and aluminum foil for up to 2 months. Thaw in the refrigerator overnight before serving.
Leave a Comment