
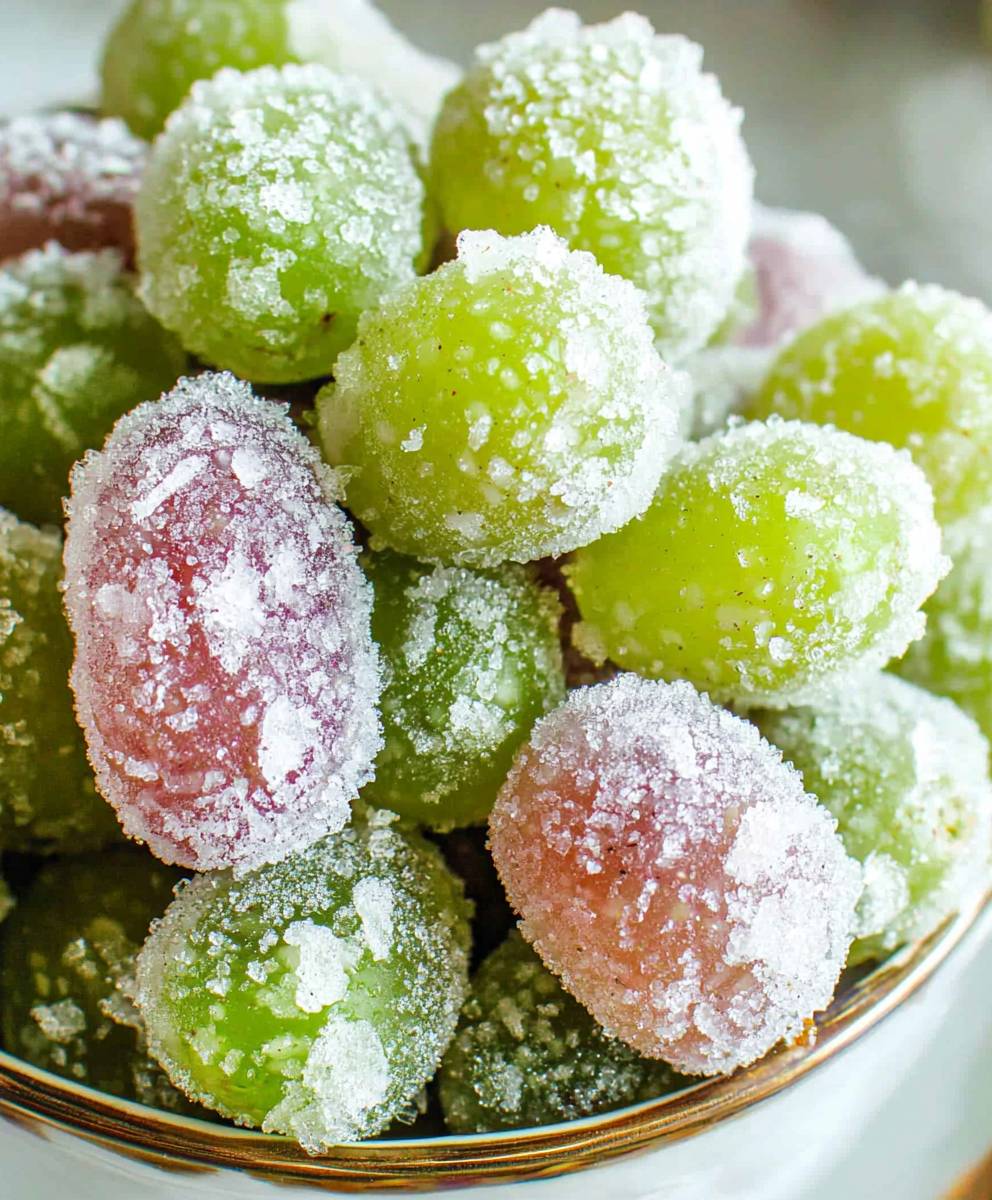
Sour Candy Frozen Grapes: Prepare to experience a taste sensation that will redefine your snacking game! Imagine the crisp, refreshing sweetness of a perfectly ripe grape, now intensified with a tangy, mouth-puckering sour candy coating, all transformed into a delightful frozen treat. This isn’t just a snack; it’s an experience.
While the exact origins of this particular frozen delight are shrouded in modern-day culinary experimentation (likely born from a TikTok trend!), the concept of preserving fruit through freezing has been around for centuries. Cultures across the globe have long utilized cold temperatures to extend the shelf life of their harvests, and what better way to enjoy the fruits of your labor than with a playful, sweet, and sour twist?
People adore sour candy frozen grapes for a multitude of reasons. Firstly, they’re incredibly easy to make – a true no-bake recipe that even the most novice cook can master. Secondly, the combination of textures is simply irresistible. The initial icy crunch gives way to a burst of juicy grape, followed by the satisfying chew of the sour candy coating. And finally, let’s be honest, who can resist that sweet and sour flavor explosion? It’s the perfect balance of indulgence and refreshment, making it an ideal treat for hot summer days or any time you’re craving a little something special. Get ready to pucker up and enjoy this addictive and surprisingly healthy snack!

Ingredients:
- 2 pounds seedless green grapes, washed and thoroughly dried
- 1 (3 ounce) package green apple flavored gelatin powder (such as Jell-O)
- 1/2 cup granulated sugar
- 1/4 cup citric acid (for extra sourness, optional but highly recommended)
- 1 tablespoon water (for helping the mixture adhere, optional)
- Pinch of salt (enhances the sweetness and sourness)
Preparing the Sour Coating:
Okay, let’s get started with the most important part – the sour coating! This is what gives our frozen grapes that irresistible zing. I like to prepare this first so it’s ready to go when the grapes are nice and dry.
- Combine the Dry Ingredients: In a medium-sized bowl, whisk together the green apple gelatin powder, granulated sugar, citric acid (if using), and a pinch of salt. Make sure everything is evenly distributed. This ensures a consistent sour flavor in every bite. I find that using a whisk helps break up any clumps in the gelatin powder.
- Adjusting the Sourness: Now, here’s where you can customize the sourness to your liking. If you’re a true sour candy fanatic, feel free to add a little more citric acid. But be careful! A little goes a long way. Taste the mixture after adding a bit more and adjust accordingly. If you prefer a milder sourness, stick to the original amount or even reduce it slightly.
- Optional: Adding Water for Better Adhesion: This step is optional, but I find it helps the sour mixture adhere to the grapes a bit better. In a separate small bowl, add 1 tablespoon of water. You will use this to lightly moisten the grapes before coating them.
Preparing the Grapes:
Now, let’s move on to the grapes. This step is crucial because the grapes need to be completely dry for the sour coating to stick properly. Trust me, soggy grapes will lead to a messy and less-than-ideal result. I’ve learned this the hard way!
- Washing the Grapes: Thoroughly wash the grapes under cold running water. Remove any stems or damaged grapes. I like to give them a good scrub to remove any dirt or residue.
- Drying the Grapes: This is the most important step! Spread the washed grapes out on a clean kitchen towel or paper towels. Gently pat them dry. Then, let them air dry for at least 30 minutes, or even longer if you have the time. The drier the grapes, the better the sour coating will adhere. You can even use a fan to speed up the drying process. I sometimes use a salad spinner to remove excess water before laying them out to dry.
Coating the Grapes:
Alright, the grapes are dry, and the sour coating is ready. Let’s get to the fun part – coating those grapes!
- Lightly Moisten (Optional): If you are using the water, lightly dip each grape in the water and then immediately proceed to the next step. Do not soak the grapes.
- Coating the Grapes: Place a handful of the dried grapes into the bowl with the sour coating mixture. Gently toss the grapes around until they are evenly coated. Make sure every grape is covered in that delicious sourness! You can use a spoon or your hands (just make sure they’re clean!).
- Removing Excess Coating: After coating, gently shake off any excess sour mixture. You don’t want a thick layer of powder, just a nice, even coating.
- Arranging on a Baking Sheet: Line a baking sheet with parchment paper or a silicone baking mat. This will prevent the grapes from sticking to the sheet during freezing. Arrange the coated grapes in a single layer on the prepared baking sheet. Make sure they are not touching each other, as this can cause them to freeze together.
- Repeating the Process: Repeat steps 1-4 with the remaining grapes until all of them are coated and arranged on the baking sheet.
Freezing the Grapes:
We’re almost there! Now it’s time to freeze those sour-coated grapes. This is what transforms them into the perfect refreshing treat.
- Freezing Time: Place the baking sheet with the coated grapes in the freezer. Freeze for at least 3-4 hours, or preferably overnight. This ensures that the grapes are completely frozen solid.
- Checking for Doneness: After the freezing time, check the grapes to make sure they are frozen solid. They should be firm to the touch.
Storing the Frozen Grapes:
Once the grapes are frozen solid, it’s time to store them properly. This will help prevent freezer burn and keep them fresh for longer.
- Transferring to a Freezer-Safe Container: Remove the frozen grapes from the baking sheet and transfer them to a freezer-safe container or a zip-top freezer bag. I prefer using a container because it helps prevent the grapes from getting crushed.
- Labeling and Dating: Label the container or bag with the date so you know when you made them. This will help you keep track of how long they’ve been in the freezer.
- Storing in the Freezer: Store the frozen grapes in the freezer for up to 2-3 months. After that, they may start to lose their flavor and texture.
Serving and Enjoying:
Finally, the moment we’ve all been waiting for – enjoying those delicious sour candy frozen grapes! Here are a few tips for serving and enjoying them.
- Serving Suggestions: Serve the frozen grapes straight from the freezer. They are best enjoyed when they are still frozen solid. You can serve them as a refreshing snack on a hot day, as a healthy dessert, or even as a fun addition to a party platter.
- Letting Them Thaw Slightly (Optional): If you prefer a slightly softer texture, you can let the grapes thaw for a few minutes before serving. However, be careful not to let them thaw too much, as they will become mushy.
- Pairing with Other Treats: These sour candy frozen grapes pair perfectly with other sweet and savory snacks. Try serving them with a bowl of vanilla ice cream, a handful of pretzels, or even a slice of cheese.
- Experimenting with Flavors: Don’t be afraid to experiment with different flavors of gelatin powder. You can try using other fruit flavors like strawberry, raspberry, or even blue raspberry. You can also add a touch of food coloring to make them even more visually appealing.
Troubleshooting Tips:
Sometimes, things don’t go exactly as planned. Here are a few troubleshooting tips to help you avoid common mistakes.
- Coating Not Sticking: If the sour coating isn’t sticking to the grapes, it’s likely because the grapes aren’t dry enough. Make sure to thoroughly dry the grapes before coating them. You can also try adding a little bit of water to the sour coating mixture to help it adhere better.
- Grapes Freezing Together: If the grapes are freezing together, it’s likely because they were touching each other on the baking sheet. Make sure to arrange the grapes in a single layer, with space between each grape.
- Grapes Becoming Mushy: If the grapes are becoming mushy, it’s likely because they are thawing too much. Make sure to store them in a freezer-safe container and keep them frozen solid.
- Too Sour: If the grapes are too sour for your liking, reduce the amount of citric acid in the sour coating mixture. You can also add a little more sugar to balance out the sourness.
- Not Sour Enough: If the grapes aren’t sour enough for your liking, add a little more citric acid to the sour coating mixture. Be careful not to add too much, as it can become overpowering.
Variations and Additions:
Want to get creative? Here are some fun variations and additions you can try.
- Different Gelatin Flavors: Experiment with different flavors of gelatin powder to create unique flavor combinations. Try using strawberry gelatin for a sweet and tart flavor, or blue raspberry gelatin for a vibrant blue color and a tangy taste.
- Adding Extracts: Add a few drops of your favorite extract to the sour coating mixture for an extra burst of flavor. Try using vanilla extract, almond extract, or even lemon extract.
- Rolling in Sprinkles: After coating the grapes in the sour mixture, roll them in sprinkles for a fun and festive look.
- 2 pounds seedless green grapes, washed and thoroughly dried
- 1 (3 ounce) package green apple flavored gelatin powder (such as Jell-O)
- 1/2 cup granulated sugar
- 1/4 cup citric acid (for extra sourness, optional but highly recommended)
- 1 tablespoon water (for helping the mixture adhere, optional)
- Pinch of salt (enhances the sweetness and sourness)
- Combine Dry Ingredients: In a medium bowl, whisk together the green apple gelatin powder, granulated sugar, citric acid (if using), and a pinch of salt. Ensure even distribution.
- Adjust Sourness (Optional): Taste and add more citric acid for extra sourness, if desired. Be cautious, a little goes a long way.
- Optional Water: In a small bowl, add 1 tablespoon of water.
- Wash Grapes: Thoroughly wash the grapes under cold running water. Remove any stems or damaged grapes.
- Dry Grapes: Spread the washed grapes on a clean kitchen towel or paper towels. Pat them dry and let them air dry for at least 30 minutes, or longer, until completely dry.
- Lightly Moisten (Optional): If using the water, lightly dip each grape in the water and then immediately proceed to the next step. Do not soak the grapes.
- Coat Grapes: Place a handful of dried grapes into the bowl with the sour coating mixture. Gently toss until evenly coated.
- Remove Excess: Shake off any excess sour mixture.
- Arrange on Baking Sheet: Line a baking sheet with parchment paper or a silicone baking mat. Arrange the coated grapes in a single layer, not touching.
- Repeat: Repeat steps 6-9 with the remaining grapes.
- Freeze: Place the baking sheet in the freezer for at least 3-4 hours, or preferably overnight, until frozen solid.
- Store: Transfer the frozen grapes to a freezer-safe container or zip-top bag. Label with the date.
- Serve: Serve straight from the freezer.
- Ensure grapes are completely dry for the coating to adhere properly.
- Adjust citric acid to your preferred sourness level.
- Store frozen grapes for up to 2-3 months.
- Experiment with different gelatin flavors for variations.
- If the coating isn’t sticking to the grapes, it’s likely because the grapes aren’t dry enough.
- If the grapes are freezing together, it’s likely because they were touching each other on the baking sheet.
- If the grapes are becoming mushy, it’s likely because they are thawing too much.
- If the grapes are too sour for your liking, reduce the amount of citric acid in the sour coating mixture.
- If the grapes aren’t sour enough for your liking, add a little more citric acid to the sour coating mixture.
Conclusion:
So, there you have it! These Sour Candy Frozen Grapes are truly a revelation. I know, I know, it sounds a little crazy, but trust me on this one. The combination of the icy, sweet grape with that tangy, sour coating is an absolute flavor explosion. It’s the perfect balance of sweet and sour, and the frozen texture makes it incredibly refreshing, especially on a hot day. This isn’t just a snack; it’s an experience!
Why is this a must-try? Well, first and foremost, it’s incredibly easy to make. We’re talking minimal ingredients and practically zero effort. Second, it’s a healthier alternative to traditional candy. You’re still getting that sweet fix, but you’re also getting the vitamins and antioxidants from the grapes. And third, it’s just plain fun! Kids and adults alike will love these little bursts of flavor. It’s a guaranteed crowd-pleaser.
But the best part? You can totally customize these to your liking! Feeling adventurous? Try using different flavors of sugar-free gelatin. Watermelon, blue raspberry, or even green apple would be fantastic. You could also experiment with different types of grapes. Red grapes offer a slightly different sweetness than green grapes, and black grapes bring a deeper, richer flavor.
Serving suggestions? Oh, the possibilities are endless! These Sour Candy Frozen Grapes are perfect as a standalone snack, of course. But you could also add them to a fruit salad for an extra zing. They’re a fun addition to a cheese board, providing a sweet and tangy contrast to the savory cheeses. And for a truly decadent treat, try dipping them in melted dark chocolate after they’re frozen. The bitterness of the chocolate perfectly complements the sour and sweet flavors.
Another fun variation is to crush up some freeze-dried fruit and use that as the coating instead of gelatin. Freeze-dried strawberries or raspberries would add a beautiful color and intense fruity flavor. You could even try using a combination of freeze-dried fruit and a touch of citric acid for an extra sour kick.
Don’t be afraid to get creative and experiment with different flavors and textures. That’s the beauty of this recipe – it’s so versatile and easy to adapt to your own preferences.
I truly believe that everyone should experience the joy of these Sour Candy Frozen Grapes. They’re the perfect combination of healthy, delicious, and fun. So, what are you waiting for? Head to the store, grab some grapes and gelatin, and get ready to make some magic!
I’m so excited for you to try this recipe! And I’d absolutely love to hear about your experience. Did you try any fun variations? What was your favorite flavor combination? Share your photos and stories in the comments below! Let’s spread the word about these amazing Sour Candy Frozen Grapes and bring a little bit of sweet and sour joy to the world! I can’t wait to see what you create!
Sour Candy Frozen Grapes: A Refreshing & Tangy Treat
Tangy, refreshing frozen green grapes coated in a sour green apple gelatin mixture. A perfect sweet and sour treat!
Leave a Comment