
Peanut Butter Jelly Cookies: Remember those classic lunchtime sandwiches that fueled your childhood adventures? Now, imagine all that nostalgic goodness baked into a soft, chewy cookie. That’s right, we’re taking the iconic peanut butter and jelly combination and transforming it into a delightful treat that will have everyone reaching for seconds!
While the exact origins of pairing peanut butter and jelly are debated, its popularity in the United States soared in the early 20th century. It became a staple, especially during the Great Depression, as it was an affordable and nutritious meal. This simple yet satisfying combination has since become a symbol of comfort and childhood innocence. Now, we’re elevating this classic pairing with a fun, modern twist.
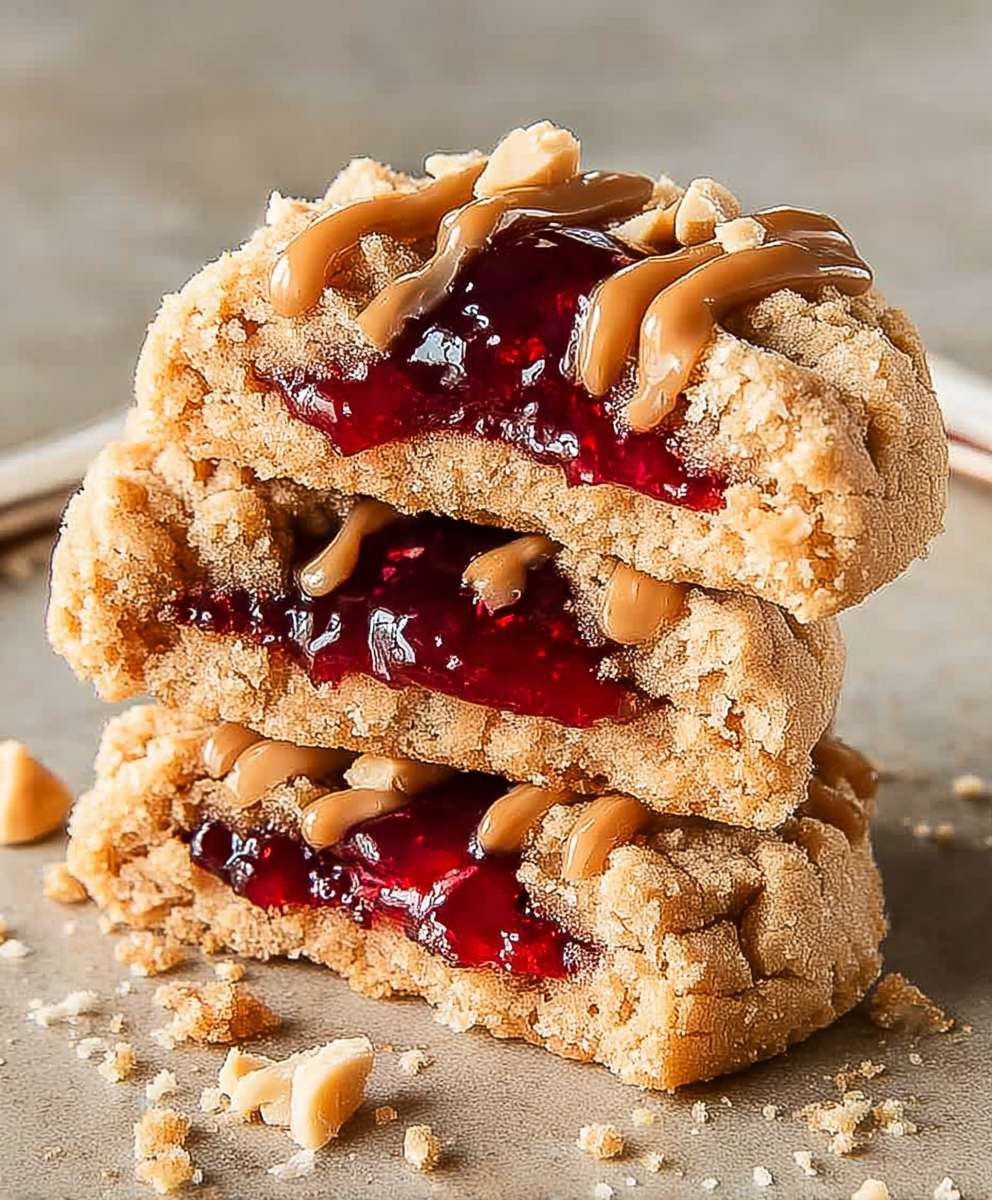
What makes Peanut Butter Jelly Cookies so irresistible? It’s the perfect balance of flavors and textures. The nutty richness of the peanut butter cookie base complements the sweet and fruity burst of the jelly filling. The soft, slightly crumbly texture of the cookie combined with the gooey center creates a truly delightful experience. Plus, these cookies are incredibly easy to make, requiring minimal ingredients and effort. Whether you’re baking for a bake sale, a holiday gathering, or simply craving a sweet treat, these cookies are guaranteed to be a crowd-pleaser. Get ready to experience a taste of nostalgia with every bite!

Ingredients:
- 1 cup (2 sticks) unsalted butter, softened
- 1 cup granulated sugar
- 1 cup packed light brown sugar
- 2 large eggs
- 1 teaspoon vanilla extract
- 1 cup creamy peanut butter
- 2 1/2 cups all-purpose flour
- 1 teaspoon baking soda
- 1 teaspoon baking powder
- 1/2 teaspoon salt
- 1/2 cup milk
- 1 cup of your favorite jelly or jam (strawberry, grape, or raspberry work great!)
- Optional: Coarse sugar for sprinkling
Preparing the Peanut Butter Cookie Dough
Alright, let’s get started on these delicious Peanut Butter Jelly Cookies! First, we need to make the peanut butter cookie dough. This is the foundation of our sweet treat, so let’s make sure we get it just right.
- Cream the Butter and Sugars: In a large bowl (or the bowl of your stand mixer), cream together the softened butter, granulated sugar, and brown sugar until light and fluffy. This usually takes about 3-5 minutes. You want the mixture to be pale and airy, as this will contribute to the cookies’ soft texture. Don’t rush this step!
- Add the Eggs and Vanilla: Beat in the eggs one at a time, making sure each egg is fully incorporated before adding the next. Then, stir in the vanilla extract. The vanilla enhances the overall flavor of the cookies, so don’t skip it!
- Mix in the Peanut Butter: Add the creamy peanut butter and mix until well combined. Make sure there are no streaks of peanut butter remaining. The peanut butter is what gives these cookies their signature flavor, so make sure it’s evenly distributed.
- Combine Dry Ingredients: In a separate medium bowl, whisk together the all-purpose flour, baking soda, baking powder, and salt. Whisking ensures that the baking soda and baking powder are evenly distributed throughout the flour, which is crucial for proper leavening.
- Gradually Add Dry Ingredients to Wet Ingredients: Gradually add the dry ingredients to the wet ingredients, mixing on low speed until just combined. Be careful not to overmix, as this can lead to tough cookies. Alternate adding the dry ingredients with the milk, beginning and ending with the dry ingredients. This helps to prevent the dough from becoming too dry or too wet.
- Chill the Dough: Cover the dough with plastic wrap and chill in the refrigerator for at least 30 minutes. Chilling the dough helps to prevent the cookies from spreading too much during baking and also allows the flavors to meld together. You can chill the dough for up to 2 hours for even better results.
Shaping and Filling the Cookies
Now that our dough is chilled, it’s time to shape and fill these beauties! This is where the magic happens, and we transform simple dough into delightful Peanut Butter Jelly Cookies.
- Preheat Oven and Prepare Baking Sheets: Preheat your oven to 375°F (190°C). Line baking sheets with parchment paper or silicone baking mats. This will prevent the cookies from sticking and make cleanup a breeze.
- Scoop the Dough: Using a cookie scoop or a spoon, scoop out rounded tablespoons of dough. Roll each portion into a ball.
- Make an Indentation: Place the dough balls onto the prepared baking sheets, leaving about 2 inches between each cookie. Use your thumb or the back of a spoon to make a deep indentation in the center of each cookie. Be generous with the indentation, as this is where the jelly will go.
- Fill with Jelly: Fill each indentation with about 1 teaspoon of your favorite jelly or jam. Don’t overfill, as the jelly may bubble over during baking. I personally love using strawberry or raspberry jelly for a classic PB&J flavor.
- Optional: Sprinkle with Sugar: If desired, sprinkle the tops of the cookies with coarse sugar for a little extra sparkle and sweetness.
Baking the Peanut Butter Jelly Cookies
Almost there! Now it’s time to bake these cookies to golden perfection. Keep a close eye on them, as baking times can vary depending on your oven.
- Bake the Cookies: Bake for 8-10 minutes, or until the edges are lightly golden brown. The centers of the cookies may still appear slightly soft, but they will firm up as they cool.
- Cool on Baking Sheets: Remove the baking sheets from the oven and let the cookies cool on the baking sheets for a few minutes before transferring them to a wire rack to cool completely. This allows the cookies to set properly and prevents them from breaking.
Tips and Variations
Want to take your Peanut Butter Jelly Cookies to the next level? Here are a few tips and variations to try:
- Use Different Jellies or Jams: Experiment with different flavors of jelly or jam to find your favorite combination. Grape jelly, apricot jam, or even fig jam would be delicious!
- Add Chocolate Chips: Stir in 1/2 cup of chocolate chips to the dough for a chocolatey twist.
- Make Them Gluten-Free: Use a gluten-free all-purpose flour blend to make these cookies gluten-free.
- Use Different Nut Butters: Try using almond butter, cashew butter, or sunflower seed butter instead of peanut butter.
- Add a Peanut Butter Glaze: Drizzle the cooled cookies with a simple peanut butter glaze made from peanut butter, powdered sugar, and milk.
- Make Thumbprint Cookies: Instead of making a deep indentation, make a smaller indentation and fill it with a smaller amount of jelly.
- Store Properly: Store the cooled cookies in an airtight container at room temperature for up to 3 days.
Troubleshooting
Sometimes things don’t go exactly as planned in the kitchen. Here are a few common problems and how to fix them:
- Cookies are Spreading Too Much: Make sure your butter is not too soft. Also, chilling the dough for a longer period of time can help.
- Cookies are Too Dry: Make sure you are not overbaking the cookies. Also, measure your flour accurately.
- Cookies are Too Hard: Avoid overmixing the dough. Overmixing develops the gluten in the flour, which can lead to tough cookies.
- Jelly is Bubbling Over: Don’t overfill the indentations with jelly. Also, make sure your oven temperature is accurate.
Enjoy!
I hope you enjoy these Peanut Butter Jelly Cookies as much as I do! They’re perfect for a snack, dessert, or even a special occasion. Happy baking!
Conclusion:
So, there you have it! These Peanut Butter Jelly Cookies are more than just a sweet treat; they’re a nostalgic trip down memory lane, baked into a perfectly chewy and satisfying cookie. I truly believe this recipe is a must-try for anyone who loves the classic PB&J combination, or simply enjoys a delicious and easy-to-make cookie. The balance of salty peanut butter and sweet, fruity jelly is simply irresistible, and the soft, slightly chewy texture makes them incredibly addictive. Trust me, you won’t be able to stop at just one!
But the best part? This recipe is incredibly versatile! Feel free to experiment with different types of peanut butter. Creamy is classic, of course, but chunky peanut butter adds a delightful textural element. You could even try using almond butter or cashew butter for a unique twist. And don’t even get me started on the jelly possibilities! Strawberry and grape are the traditional choices, but raspberry, blackberry, or even a fig jam would be absolutely divine. For a truly decadent experience, consider using a homemade fruit preserve. The possibilities are endless, so let your creativity shine!
Beyond the basic ingredients, there are so many ways to customize these cookies to your liking. For a richer flavor, try adding a sprinkle of sea salt on top before baking. This will enhance the sweetness of the jelly and create a wonderful contrast with the peanut butter. If you’re a chocolate lover (and who isn’t?), you could even drizzle melted chocolate over the cooled cookies for an extra layer of indulgence. Or, for a festive touch, add some colorful sprinkles before baking. These cookies are perfect for holidays, birthdays, or any occasion that calls for a little bit of sweetness.
Serving suggestions? Well, these cookies are delicious on their own, of course. But they’re also fantastic with a cold glass of milk, a cup of hot coffee, or even a scoop of vanilla ice cream. Imagine a warm Peanut Butter Jelly Cookie crumbled over a bowl of ice cream – pure bliss! They’re also a great addition to a lunchbox, a picnic basket, or a dessert platter. And if you’re feeling generous, they make a wonderful homemade gift for friends and family. Who wouldn’t appreciate a batch of freshly baked cookies?
I’m so confident that you’ll love these cookies, and I can’t wait to hear about your experience! So, go ahead, gather your ingredients, preheat your oven, and get baking! Don’t be afraid to experiment with different variations and make them your own. Once you’ve tried this recipe, I’m sure it will become a staple in your baking repertoire. And please, don’t forget to share your creations with me! I’d love to see your photos and hear about your favorite variations. You can tag me on social media using [Your Social Media Handle] or leave a comment below. Happy baking!
I truly hope you enjoy making and eating these Peanut Butter Jelly Cookies as much as I do. They’re a simple, comforting, and utterly delicious treat that’s sure to bring a smile to your face. So, what are you waiting for? Get in the kitchen and start baking!
Peanut Butter Jelly Cookies: The Ultimate Recipe and Baking Guide
Soft, chewy peanut butter cookies with a sweet jelly filling, like a classic PB&J.
Ingredients
- 1 cup (2 sticks) unsalted butter, softened
- 1 cup granulated sugar
- 1 cup packed light brown sugar
- 2 large eggs
- 1 teaspoon vanilla extract
- 1 cup creamy peanut butter
- 2 1/2 cups all-purpose flour
- 1 teaspoon baking soda
- 1 teaspoon baking powder
- 1/2 teaspoon salt
- 1/2 cup milk
- 1 cup of your favorite jelly or jam (strawberry, grape, or raspberry work great!)
- Optional: Coarse sugar for sprinkling
Instructions
- Cream the Butter and Sugars: In a large bowl (or the bowl of your stand mixer), cream together the softened butter, granulated sugar, and brown sugar until light and fluffy (3-5 minutes).
- Add the Eggs and Vanilla: Beat in the eggs one at a time, fully incorporating each before adding the next. Stir in the vanilla extract.
- Mix in the Peanut Butter: Add the creamy peanut butter and mix until well combined.
- Combine Dry Ingredients: In a separate medium bowl, whisk together the all-purpose flour, baking soda, baking powder, and salt.
- Gradually Add Dry Ingredients to Wet Ingredients: Gradually add the dry ingredients to the wet ingredients, mixing on low speed until just combined. Alternate adding the dry ingredients with the milk, beginning and ending with the dry ingredients.
- Chill the Dough: Cover the dough with plastic wrap and chill in the refrigerator for at least 30 minutes (up to 2 hours).
- Preheat Oven and Prepare Baking Sheets: Preheat your oven to 375°F (190°C). Line baking sheets with parchment paper or silicone baking mats.
- Scoop the Dough: Using a cookie scoop or a spoon, scoop out rounded tablespoons of dough. Roll each portion into a ball.
- Make an Indentation: Place the dough balls onto the prepared baking sheets, leaving about 2 inches between each cookie. Use your thumb or the back of a spoon to make a deep indentation in the center of each cookie.
- Fill with Jelly: Fill each indentation with about 1 teaspoon of your favorite jelly or jam.
- Optional: Sprinkle with Sugar: If desired, sprinkle the tops of the cookies with coarse sugar.
- Bake the Cookies: Bake for 8-10 minutes, or until the edges are lightly golden brown.
- Cool on Baking Sheets: Remove the baking sheets from the oven and let the cookies cool on the baking sheets for a few minutes before transferring them to a wire rack to cool completely.
Notes
- Chilling the dough is important to prevent excessive spreading.
- Don’t overmix the dough, as this can lead to tough cookies.
- Use your favorite jelly or jam for a personalized flavor.
- Store cooled cookies in an airtight container at room temperature for up to 3 days.
- If cookies are spreading too much, chill the dough longer or ensure butter isn’t too soft.
- If cookies are too dry, avoid overbaking and measure flour accurately.
- If cookies are too hard, avoid overmixing the dough.
- If jelly is bubbling over, don’t overfill the indentations and ensure oven temperature is accurate.
Leave a Comment