
Halloween breadstick bones are the spooky-delicious treat that will have everyone at your Halloween gathering reaching for more! Forget the sugary sweets for a moment and sink your teeth into these savory, bone-chillingly good breadsticks. I remember the first time I saw these; I was immediately captivated by their playful, yet slightly eerie, appearance. They’re not just fun to look at; they’re incredibly satisfying to eat, too.
While breadsticks themselves have a long and storied history, tracing back to the grissini of Turin, Italy, the Halloween twist is a relatively modern invention. It’s a testament to our love of combining tradition with festive creativity. These Halloween breadstick bones perfectly capture the spirit of the holiday – a little bit spooky, a whole lot of fun, and undeniably delicious.
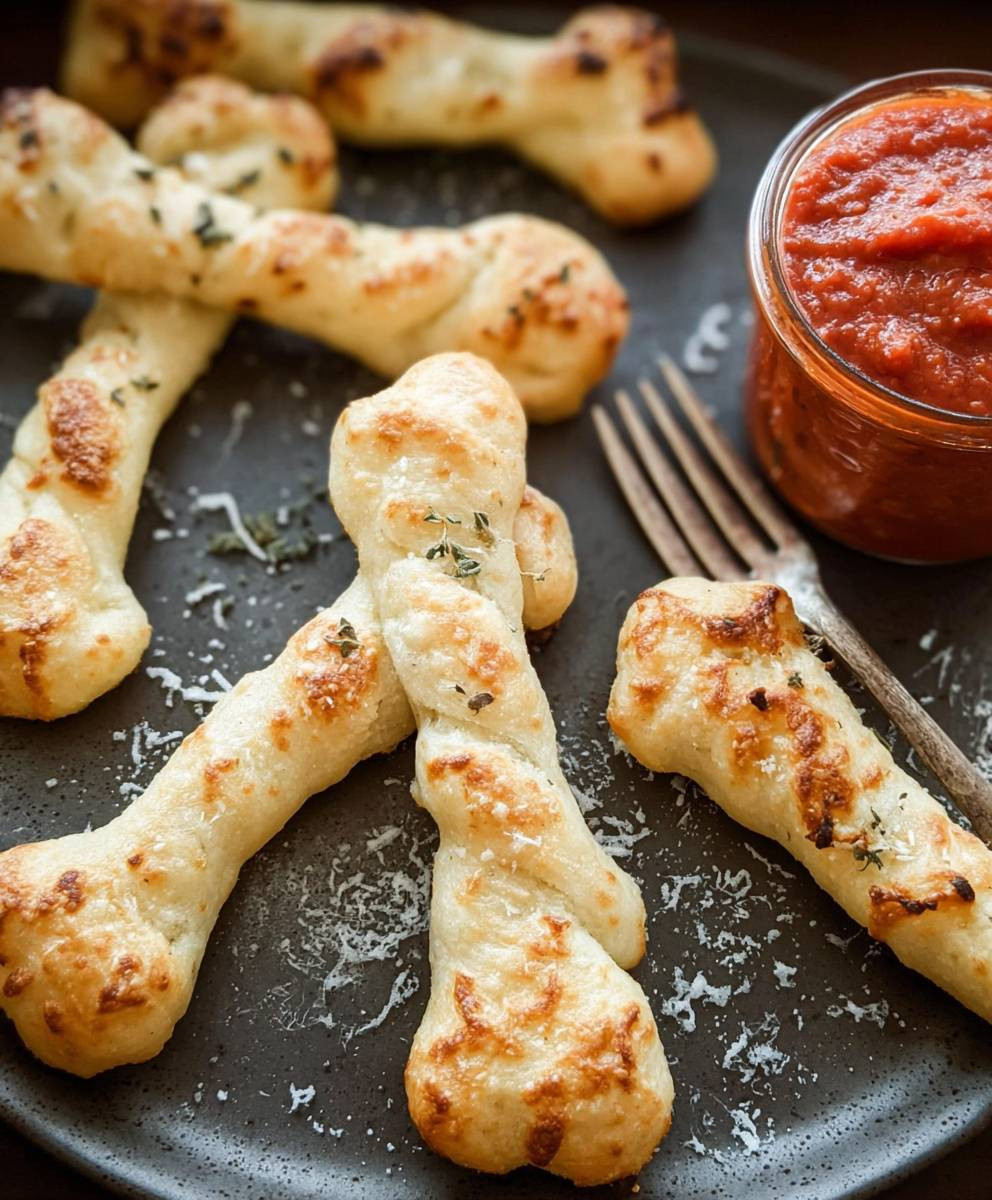
What makes these breadsticks so irresistible? It’s the perfect combination of a soft, chewy interior and a slightly crisp exterior, seasoned with just the right amount of garlic, herbs, and maybe a sprinkle of Parmesan cheese. Plus, the novelty of eating a bone-shaped breadstick is undeniably appealing, especially to kids (and let’s be honest, adults too!). They’re easy to make, relatively quick to bake, and a guaranteed crowd-pleaser. So, ditch the store-bought snacks this year and impress your guests with these homemade, bone-afide treats!

Ingredients:
- 1 package (0.25 ounce) active dry yeast
- 1 teaspoon sugar
- 1/4 cup warm water (105-115 degrees F)
- 1 cup warm milk (105-115 degrees F)
- 1/4 cup butter, melted
- 1 teaspoon salt
- 3 1/4 – 3 3/4 cups all-purpose flour, plus more for dusting
- 1 large egg, beaten
- Coarse salt, for sprinkling (optional)
- Everything bagel seasoning, for sprinkling (optional)
- Olive oil, for brushing
- Marinara sauce, for serving (optional)
Preparing the Dough:
- Activate the Yeast: In a large bowl, dissolve the yeast and sugar in the warm water. Let stand for 5-10 minutes, or until foamy. This step is crucial to ensure your yeast is alive and active, which will give your breadsticks a good rise. If it doesn’t foam, your yeast might be old, and you’ll need to start with a fresh packet.
- Combine Wet Ingredients: Add the warm milk, melted butter, and salt to the yeast mixture. Stir well to combine all the wet ingredients. Make sure the butter isn’t too hot, or it could kill the yeast.
- Add Flour Gradually: Gradually add the flour, one cup at a time, mixing well after each addition. Start with 3 1/4 cups and add more as needed until a soft dough forms. The dough should be slightly sticky but not so sticky that it’s impossible to handle.
- Knead the Dough: Turn the dough out onto a lightly floured surface. Knead for 6-8 minutes, or until the dough is smooth and elastic. You can also use a stand mixer with a dough hook attachment for this step. If the dough is too sticky, add a little more flour, one tablespoon at a time.
- First Rise: Place the dough in a lightly oiled bowl, turning to coat all sides. Cover with plastic wrap or a clean kitchen towel and let rise in a warm place for 1-1.5 hours, or until doubled in size. This rise is essential for developing the flavor and texture of the breadsticks.
Shaping the Breadstick Bones:
- Punch Down the Dough: Gently punch down the dough to release the air. Turn it out onto a lightly floured surface.
- Divide the Dough: Divide the dough into 16 equal pieces. I find it easiest to cut the dough in half, then cut each half in half again, and so on, until you have 16 pieces.
- Roll into Ropes: Roll each piece of dough into a rope about 8-10 inches long. The thickness of the rope will determine the thickness of your breadstick bones.
- Shape the Bones: To shape the bones, place a rope on a baking sheet lined with parchment paper. Gently pinch the dough about 1 inch from each end to create the “knuckles” of the bone. You can also use a knife to make small cuts on each end to further define the bone shape. Don’t worry about making them perfect; the imperfections add to the spooky charm!
- Repeat: Repeat steps 3 and 4 with the remaining dough pieces. Arrange the breadstick bones on the baking sheets, leaving some space between each one.
Second Rise and Baking:
- Second Rise: Cover the shaped breadstick bones with plastic wrap or a clean kitchen towel and let rise for 20-30 minutes. This second rise will help them become even lighter and fluffier.
- Preheat Oven: Preheat oven to 375 degrees F (190 degrees C).
- Egg Wash: In a small bowl, whisk the beaten egg with a tablespoon of water to create an egg wash.
- Brush with Egg Wash: Brush the breadstick bones with the egg wash. This will give them a beautiful golden-brown color.
- Sprinkle with Seasonings: Sprinkle the breadstick bones with coarse salt and/or everything bagel seasoning, if desired. These additions will enhance the flavor and add a nice texture.
- Bake: Bake for 12-15 minutes, or until golden brown. Keep a close eye on them, as baking times may vary depending on your oven.
- Brush with Olive Oil: Remove the breadstick bones from the oven and brush them with olive oil. This will add a nice sheen and keep them soft.
- Cool Slightly: Let the breadstick bones cool slightly on the baking sheets before serving.
Serving Suggestions:
Serve the Halloween breadstick bones warm with marinara sauce for dipping. They’re also delicious on their own or as part of a Halloween-themed appetizer platter. You can get creative with the dipping sauces and offer a variety of options, such as pesto, cheese sauce, or even a spooky black garlic aioli.
Tips and Tricks:
- Yeast Activation: Always check the expiration date of your yeast before using it. If you’re unsure if your yeast is still good, test it by dissolving it in warm water with a little sugar. If it doesn’t foam after 5-10 minutes, it’s best to use a fresh packet.
- Dough Consistency: The dough should be soft and slightly sticky. If it’s too sticky, add a little more flour, one tablespoon at a time. If it’s too dry, add a little more warm water, one teaspoon at a time.
- Kneading Time: Kneading the dough is important for developing the gluten, which gives the breadsticks their structure. Knead for at least 6-8 minutes, or until the dough is smooth and elastic.
- Rising Time: The rising time will vary depending on the temperature of your kitchen. In a warm place, the dough will rise faster. In a cooler place, it will take longer.
- Shaping Techniques: Get creative with the bone shapes! You can make them longer, shorter, thicker, or thinner. You can also add more “knuckles” or use a knife to create more detailed bone markings.
- Baking Time: Baking times may vary depending on your oven. Keep a close eye on the breadstick bones and bake them until they’re golden brown.
- Storage: Store leftover breadstick bones in an airtight container at room temperature for up to 2 days. You can also freeze them for longer storage. To reheat, bake them in a preheated oven at 350 degrees F (175 degrees C) for 5-10 minutes.
Variations:
- Garlic Breadstick Bones: Add 1-2 cloves of minced garlic to the dough for a garlicky flavor.
- Cheese Breadstick Bones: Sprinkle shredded Parmesan cheese or mozzarella cheese on top of the breadstick bones before baking.
- Herb Breadstick Bones: Add 1-2 tablespoons of chopped fresh herbs, such as rosemary, thyme, or oregano, to the dough.
- Spicy Breadstick Bones: Add 1/2 teaspoon of red pepper flakes to the dough for a spicy kick.
- Sweet Breadstick Bones: Add 2-3 tablespoons of sugar to the dough for a slightly sweet flavor. You can also brush the baked breadsticks with melted butter and sprinkle them with cinnamon sugar.
Conclusion:
And there you have it! These Halloween breadstick bones are more than just a spooky snack; they’re a fun, engaging, and utterly delicious way to celebrate the season. I truly believe this recipe is a must-try for anyone looking to add a touch of creative flair to their Halloween festivities. The combination of the savory, garlicky breadsticks with the playful bone shape makes them a hit with both kids and adults alike. They’re incredibly easy to make, requiring minimal ingredients and effort, yet the visual impact is huge. Forget store-bought treats; these homemade breadstick bones are guaranteed to be the star of your Halloween spread.
But the best part? You can totally customize them to your liking! Feeling adventurous? Try adding a pinch of red pepper flakes to the dough for a subtle kick. Or, for a sweeter twist, brush them with a honey-garlic glaze after baking. The possibilities are endless!
Serving Suggestions and Variations
These breadstick bones are incredibly versatile. Serve them as a spooky appetizer at your Halloween party, alongside a bowl of warm marinara sauce for dipping. They also make a fantastic addition to a Halloween-themed charcuterie board, paired with cheeses, olives, and cured meats. For a complete meal, serve them with a hearty bowl of tomato soup or a creamy pumpkin bisque.
Here are a few more ideas to get your creative juices flowing:
* Cheesy Bones: Sprinkle shredded Parmesan or mozzarella cheese over the breadsticks before baking for a cheesy, gooey delight.
* Herb-Infused Bones: Add dried herbs like rosemary, thyme, or oregano to the dough for an extra layer of flavor.
* Stuffed Bones: Before shaping the breadsticks, flatten the dough and fill it with a mixture of ricotta cheese, spinach, and garlic. Then, roll it up and shape it into a bone.
* Sweet Bones: For a dessert version, use a sweet dough and sprinkle the breadsticks with cinnamon sugar before baking. Drizzle with icing after they cool.
* Gluten-Free Bones: Use a gluten-free breadstick recipe to accommodate dietary restrictions.
I’ve had so much fun experimenting with different variations of this recipe, and I encourage you to do the same! Don’t be afraid to get creative and put your own spin on it. After all, Halloween is all about having fun and embracing the spooky spirit.
I’m confident that you’ll love making and sharing these Halloween breadstick bones as much as I do. They’re a guaranteed crowd-pleaser and a fantastic way to create lasting memories with your loved ones.
So, what are you waiting for? Gather your ingredients, preheat your oven, and get ready to bake up some spooky fun! I can’t wait to hear about your experience. Please, please, please try this recipe!
Once you’ve made your own batch of these delightful breadstick bones, I’d absolutely love to hear about it! Share your photos and stories on social media using [Your Hashtag Here] or leave a comment below. Let me know what variations you tried, what dipping sauces you paired them with, and how much your family and friends enjoyed them. Your feedback is invaluable, and it helps me continue to create delicious and inspiring recipes for you. Happy baking, and Happy Halloween!
Halloween Breadstick Bones: A Spooky & Delicious Recipe
Spooky Halloween breadstick bones! Homemade and perfect for dipping in marinara sauce. A fun, festive treat!
Ingredients
- 1 package (0.25 ounce) active dry yeast
- 1 teaspoon sugar
- 1/4 cup warm water (105-115 degrees F)
- 1 cup warm milk (105-115 degrees F)
- 1/4 cup butter, melted
- 1 teaspoon salt
- 3 1/4 – 3 3/4 cups all-purpose flour, plus more for dusting
- 1 large egg, beaten
- Coarse salt, for sprinkling (optional)
- Everything bagel seasoning, for sprinkling (optional)
- Olive oil, for brushing
- Marinara sauce, for serving (optional)
Instructions
- Activate the Yeast: In a large bowl, dissolve the yeast and sugar in the warm water. Let stand for 5-10 minutes, or until foamy.
- Combine Wet Ingredients: Add the warm milk, melted butter, and salt to the yeast mixture. Stir well to combine.
- Add Flour Gradually: Gradually add the flour, one cup at a time, mixing well after each addition. Start with 3 1/4 cups and add more as needed until a soft dough forms.
- Knead the Dough: Turn the dough out onto a lightly floured surface. Knead for 6-8 minutes, or until the dough is smooth and elastic.
- First Rise: Place the dough in a lightly oiled bowl, turning to coat all sides. Cover with plastic wrap or a clean kitchen towel and let rise in a warm place for 1-1.5 hours, or until doubled in size.
- Punch Down the Dough: Gently punch down the dough to release the air. Turn it out onto a lightly floured surface.
- Divide the Dough: Divide the dough into 16 equal pieces.
- Roll into Ropes: Roll each piece of dough into a rope about 8-10 inches long.
- Shape the Bones: Place a rope on a baking sheet lined with parchment paper. Gently pinch the dough about 1 inch from each end to create the “knuckles” of the bone. You can also use a knife to make small cuts on each end to further define the bone shape.
- Repeat: Repeat steps 8 and 9 with the remaining dough pieces. Arrange the breadstick bones on the baking sheets, leaving some space between each one.
- Second Rise: Cover the shaped breadstick bones with plastic wrap or a clean kitchen towel and let rise for 20-30 minutes.
- Preheat Oven: Preheat oven to 375 degrees F (190 degrees C).
- Egg Wash: In a small bowl, whisk the beaten egg with a tablespoon of water to create an egg wash.
- Brush with Egg Wash: Brush the breadstick bones with the egg wash.
- Sprinkle with Seasonings: Sprinkle the breadstick bones with coarse salt and/or everything bagel seasoning, if desired.
- Bake: Bake for 12-15 minutes, or until golden brown.
- Brush with Olive Oil: Remove the breadstick bones from the oven and brush them with olive oil.
- Cool Slightly: Let the breadstick bones cool slightly on the baking sheets before serving.
- Serve: Serve warm with marinara sauce for dipping.
Notes
- Always check the expiration date of your yeast.
- The dough should be soft and slightly sticky.
- Kneading the dough is important for developing the gluten.
- The rising time will vary depending on the temperature of your kitchen.
- Get creative with the bone shapes!
- Baking times may vary depending on your oven.
- Store leftover breadstick bones in an airtight container at room temperature for up to 2 days. You can also freeze them for longer storage. To reheat, bake them in a preheated oven at 350 degrees F (175 degrees C) for 5-10 minutes.


Leave a Comment