
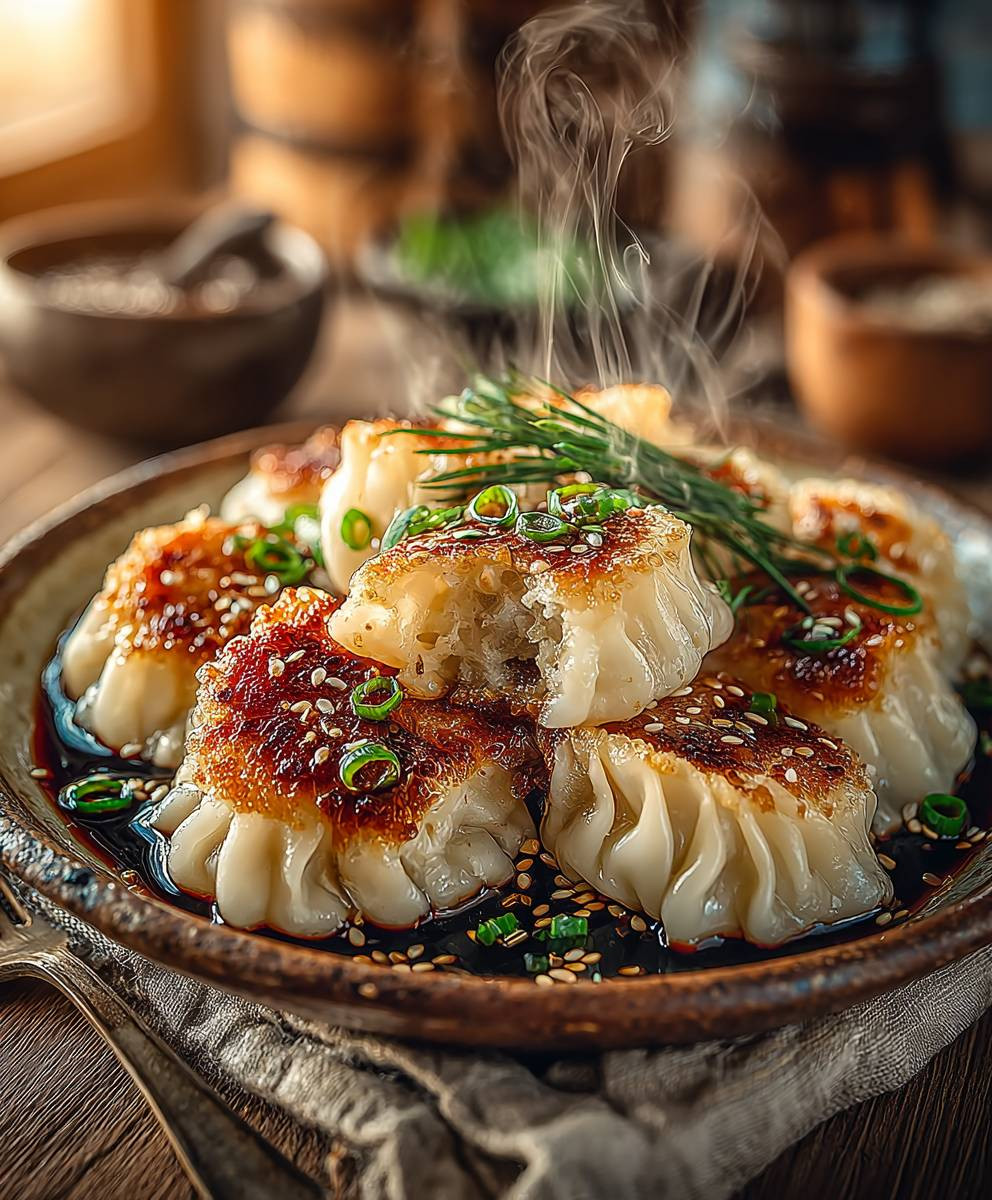
Chicken Potstickers Pan Fried Dumplings: Crispy, savory, and utterly irresistible, these little pockets of deliciousness are about to become your new favorite weeknight meal! Imagine sinking your teeth into a perfectly golden-brown exterior, giving way to a juicy, flavorful chicken filling. Are you drooling yet? I know I am just thinking about them!
Potstickers, also known as “guo tie” in Mandarin Chinese, have a rich history dating back centuries. Legend has it that a chef accidentally burned a batch of boiled dumplings, but the crispy bottom turned out to be a delightful surprise. From that happy accident, a culinary star was born! These dumplings are often enjoyed during Lunar New Year celebrations, symbolizing wealth and good fortune.
But what is it about Chicken Potstickers Pan Fried Dumplings that makes them so universally loved? It’s the perfect combination of textures – the satisfying crunch of the pan-fried bottom, the soft, chewy wrapper, and the tender, flavorful filling. Plus, they’re incredibly versatile! Serve them as an appetizer, a light lunch, or a satisfying dinner. And let’s be honest, who can resist a dish that’s both delicious and fun to eat? Get ready to master the art of making these delectable Chicken Potstickers Pan Fried Dumplings at home – I promise, it’s easier than you think!

Ingredients:
- For the Dough:
- 3 cups all-purpose flour, plus more for dusting
- 1 cup warm water (around 110°F or 43°C)
- 1/2 teaspoon salt
- For the Filling:
- 1 pound ground chicken
- 1 cup finely chopped napa cabbage
- 1/2 cup finely chopped green onions
- 1/4 cup finely chopped shiitake mushrooms (optional, but highly recommended!)
- 2 tablespoons soy sauce
- 1 tablespoon rice vinegar
- 1 tablespoon sesame oil
- 1 teaspoon grated ginger
- 1 clove garlic, minced
- 1/2 teaspoon sugar
- 1/4 teaspoon white pepper
- 1/4 teaspoon salt (or to taste, remember the soy sauce is salty!)
- For Cooking:
- 2 tablespoons vegetable oil (or any neutral oil)
- 1/2 cup water
- For Dipping Sauce (optional, but highly recommended!):
- 1/4 cup soy sauce
- 2 tablespoons rice vinegar
- 1 tablespoon sesame oil
- 1 teaspoon chili garlic sauce (or more, to taste)
- 1/2 teaspoon grated ginger (optional)
- 1 green onion, thinly sliced (optional)
Making the Dough:
Okay, let’s start with the dough. Don’t be intimidated! It’s easier than you think. I promise!
- Combine Dry Ingredients: In a large bowl, whisk together the flour and salt. This helps distribute the salt evenly throughout the dough.
- Add Water: Gradually add the warm water to the flour mixture, mixing with a wooden spoon or your hands until a shaggy dough forms. The water temperature is important here; too cold and the dough won’t come together properly, too hot and you risk damaging the gluten development.
- Knead the Dough: Turn the dough out onto a lightly floured surface. Knead for 8-10 minutes, or until the dough is smooth and elastic. This is where the magic happens! Kneading develops the gluten, which gives the potstickers their chewy texture. If the dough is too sticky, add a little more flour, a tablespoon at a time. If it’s too dry, add a teaspoon of water at a time.
- Rest the Dough: Form the dough into a ball, place it back in the bowl, and cover it with a damp cloth or plastic wrap. Let it rest for at least 30 minutes, or even up to an hour. This allows the gluten to relax, making the dough easier to roll out later. Trust me, this step is worth it!
Preparing the Filling:
While the dough is resting, let’s get that delicious filling ready. This is where you can really customize the flavors to your liking!
- Combine Ingredients: In a large bowl, combine the ground chicken, napa cabbage, green onions, shiitake mushrooms (if using), soy sauce, rice vinegar, sesame oil, ginger, garlic, sugar, white pepper, and salt.
- Mix Thoroughly: Use your hands (or a spoon, if you prefer) to mix all the ingredients together until they are well combined. Be careful not to overmix, as this can make the filling tough.
- Taste and Adjust: This is a crucial step! Take a small amount of the filling and cook it in a pan until cooked through. Taste it and adjust the seasonings as needed. Does it need more soy sauce? A little more ginger? Now’s the time to make it perfect!
Assembling the Potstickers:
Now for the fun part! This might take a little practice, but don’t worry, even if they’re not perfectly shaped, they’ll still taste amazing.
- Divide the Dough: After the dough has rested, divide it in half. Keep one half covered while you work with the other.
- Roll into a Rope: Roll the dough into a long rope, about 1 inch in diameter.
- Cut into Pieces: Cut the rope into small pieces, about 1 inch long. You should get around 20-25 pieces from each half of the dough.
- Flatten Each Piece: Flatten each piece into a small disc. You can use a rolling pin or a dumpling press. Aim for a circle about 3 inches in diameter. The center of the circle should be slightly thicker than the edges. This will prevent the filling from leaking out.
- Fill the Dumplings: Place about 1 tablespoon of the filling in the center of each wrapper. Don’t overfill them, or they’ll be difficult to seal.
- Seal the Dumplings: There are several ways to seal potstickers. Here’s my favorite:
- Fold the wrapper in half to form a half-moon shape.
- Pinch the edges together to seal the dumpling.
- For a more decorative crimp, start at one end and make small pleats along one edge of the wrapper. Press the pleats firmly against the other edge to seal.
- Repeat: Repeat steps 4-6 until all the dough and filling are used.
- Prevent Sticking: As you assemble the potstickers, place them on a lightly floured baking sheet or a plate lined with parchment paper to prevent them from sticking.
Cooking the Potstickers:
Time to cook these little beauties! The pan-frying method gives them a crispy bottom and a tender top. It’s the best of both worlds!
- Heat the Oil: Heat the vegetable oil in a large, non-stick skillet over medium-high heat. Make sure the pan is hot before adding the potstickers.
- Arrange Potstickers: Arrange the potstickers in the skillet in a single layer, making sure they are not touching. You may need to cook them in batches.
- Sear the Bottoms: Cook the potstickers for 2-3 minutes, or until the bottoms are golden brown and crispy. Keep an eye on them, as they can burn easily.
- Add Water: Carefully pour 1/2 cup of water into the skillet. The water will create steam, which will cook the potstickers through.
- Cover and Steam: Immediately cover the skillet with a lid and reduce the heat to medium-low. Let the potstickers steam for 8-10 minutes, or until the water has evaporated and the potstickers are cooked through.
- Check for Doneness: To check if the potstickers are done, insert a fork into one of them. If the filling is hot and the wrapper is translucent, they’re ready.
- Crisp the Bottoms (Optional): If you want the bottoms to be extra crispy, remove the lid and cook for another minute or two, until all the water has evaporated and the bottoms are nicely browned.
- Remove and Serve: Carefully remove the potstickers from the skillet and serve immediately with your favorite dipping sauce.
Making the Dipping Sauce:
While the potstickers are cooking, let’s whip up a quick and easy dipping sauce. This sauce is the perfect complement to the savory potstickers.
- Combine Ingredients: In a small bowl, combine the soy sauce, rice vinegar, sesame oil, chili garlic sauce, ginger (if using), and green onion (if using).
- Mix Well: Stir all the ingredients together until they are well combined.
- Taste and Adjust: Taste the sauce and adjust the seasonings as needed. Do you want it spicier? Add more chili garlic sauce. Do you want it tangier? Add more rice vinegar.
Tips and Tricks for Perfect Potstickers:
- Don’t Overfill: Overfilling the potstickers is a common mistake. It makes them difficult to seal and can cause them to burst during cooking.
- Seal Tightly: Make sure to seal the potstickers tightly to prevent the filling from leaking out.
- Use a Non-Stick Skillet: A non-stick skillet is essential for preventing the potstickers from sticking and burning.
- Don’t Overcrowd the Pan: Cook the potstickers in batches to
Conclusion:
So there you have it! These pan-fried Chicken Potstickers are truly a must-try recipe, and I’m confident they’ll become a regular feature on your dinner table. Why? Because they deliver that perfect combination of crispy, golden-brown bottoms, tender, juicy filling, and a flavor explosion that will leave you craving more. Forget takeout – these homemade potstickers are fresher, healthier, and honestly, way more satisfying to make and eat.
But the best part? They’re surprisingly easy to put together, even for beginner cooks. The step-by-step instructions I’ve shared will guide you through the entire process, from preparing the flavorful chicken filling to mastering the art of the perfect pan-fry. And trust me, once you get the hang of it, you’ll be churning out batches of these delicious dumplings in no time.
Beyond the incredible taste and ease of preparation, these Chicken Potstickers are incredibly versatile. Looking for serving suggestions? I love serving them with a simple dipping sauce made from soy sauce, rice vinegar, sesame oil, and a touch of chili garlic sauce for a little kick. You can also get creative with your dipping sauces – try a ginger-scallion sauce, a peanut sauce, or even a sweet and sour sauce. They’re also fantastic as part of a larger Asian-inspired meal, alongside some stir-fried vegetables, noodles, or rice.
And don’t be afraid to experiment with variations! If you’re not a fan of chicken, you can easily substitute ground pork, turkey, or even shrimp. For a vegetarian option, try using tofu or a mixture of finely chopped vegetables like cabbage, carrots, and mushrooms. You can also add different spices and herbs to the filling to customize the flavor to your liking. A little ginger, garlic, and green onion are always a good starting point, but feel free to add other ingredients like cilantro, lemongrass, or even a pinch of red pepper flakes for some extra heat.
These Chicken Potstickers are also great for meal prepping. You can make a big batch of them ahead of time and freeze them for later. Simply freeze them on a baking sheet in a single layer, and then transfer them to a freezer bag once they’re frozen solid. When you’re ready to cook them, you can pan-fry them straight from frozen – just add a few extra minutes to the cooking time. This makes them a perfect option for busy weeknights when you don’t have a lot of time to cook.
I truly believe that this recipe is a winner, and I can’t wait for you to try it. So, gather your ingredients, put on some music, and get ready to embark on a culinary adventure. I promise you won’t be disappointed!
Now, it’s your turn! I’m so excited to hear about your experience making these Chicken Potstickers. Did you try any variations? What dipping sauce did you use? What did your family and friends think? Please share your thoughts and photos in the comments below. I love seeing your creations and hearing your feedback. Happy cooking!
Chicken Potstickers Pan Fried Dumplings: A Crispy, Delicious Recipe
Delicious homemade chicken potstickers with a savory filling and crispy bottoms. Perfect for a snack, appetizer, or light meal!
Ingredients
- 3 cups all-purpose flour, plus more for dusting
- 1 cup warm water (around 110°F or 43°C)
- 1/2 teaspoon salt
- 1 pound ground chicken
- 1 cup finely chopped napa cabbage
- 1/2 cup finely chopped green onions
- 1/4 cup finely chopped shiitake mushrooms (optional, but highly recommended!)
- 2 tablespoons soy sauce
- 1 tablespoon rice vinegar
- 1 tablespoon sesame oil
- 1 teaspoon grated ginger
- 1 clove garlic, minced
- 1/2 teaspoon sugar
- 1/4 teaspoon white pepper
- 1/4 teaspoon salt (or to taste, remember the soy sauce is salty!)
- 2 tablespoons vegetable oil (or any neutral oil)
- 1/2 cup water
- 1/4 cup soy sauce
- 2 tablespoons rice vinegar
- 1 tablespoon sesame oil
- 1 teaspoon chili garlic sauce (or more, to taste)
- 1/2 teaspoon grated ginger (optional)
- 1 green onion, thinly sliced (optional)
Instructions
- Combine Dry Ingredients: In a large bowl, whisk together the flour and salt.
- Add Water: Gradually add the warm water to the flour mixture, mixing with a wooden spoon or your hands until a shaggy dough forms.
- Knead the Dough: Turn the dough out onto a lightly floured surface. Knead for 8-10 minutes, or until the dough is smooth and elastic. If the dough is too sticky, add a little more flour, a tablespoon at a time. If it’s too dry, add a teaspoon of water at a time.
- Rest the Dough: Form the dough into a ball, place it back in the bowl, and cover it with a damp cloth or plastic wrap. Let it rest for at least 30 minutes, or even up to an hour.
- Combine Ingredients: In a large bowl, combine the ground chicken, napa cabbage, green onions, shiitake mushrooms (if using), soy sauce, rice vinegar, sesame oil, ginger, garlic, sugar, white pepper, and salt.
- Mix Thoroughly: Use your hands (or a spoon, if you prefer) to mix all the ingredients together until they are well combined. Be careful not to overmix, as this can make the filling tough.
- Taste and Adjust: Take a small amount of the filling and cook it in a pan until cooked through. Taste it and adjust the seasonings as needed.
- Divide the Dough: After the dough has rested, divide it in half. Keep one half covered while you work with the other.
- Roll into a Rope: Roll the dough into a long rope, about 1 inch in diameter.
- Cut into Pieces: Cut the rope into small pieces, about 1 inch long. You should get around 20-25 pieces from each half of the dough.
- Flatten Each Piece: Flatten each piece into a small disc. You can use a rolling pin or a dumpling press. Aim for a circle about 3 inches in diameter. The center of the circle should be slightly thicker than the edges.
- Fill the Dumplings: Place about 1 tablespoon of the filling in the center of each wrapper. Don’t overfill them, or they’ll be difficult to seal.
- Seal the Dumplings: Fold the wrapper in half to form a half-moon shape. Pinch the edges together to seal the dumpling. For a more decorative crimp, start at one end and make small pleats along one edge of the wrapper. Press the pleats firmly against the other edge to seal.
- Repeat: Repeat steps 4-6 until all the dough and filling are used.
- Prevent Sticking: As you assemble the potstickers, place them on a lightly floured baking sheet or a plate lined with parchment paper to prevent them from sticking.
- Heat the Oil: Heat the vegetable oil in a large, non-stick skillet over medium-high heat.
- Arrange Potstickers: Arrange the potstickers in the skillet in a single layer, making sure they are not touching. You may need to cook them in batches.
- Sear the Bottoms: Cook the potstickers for 2-3 minutes, or until the bottoms are golden brown and crispy.
- Add Water: Carefully pour 1/2 cup of water into the skillet.
- Cover and Steam: Immediately cover the skillet with a lid and reduce the heat to medium-low. Let the potstickers steam for 8-10 minutes, or until the water has evaporated and the potstickers are cooked through.
- Check for Doneness: To check if the potstickers are done, insert a fork into one of them. If the filling is hot and the wrapper is translucent, they’re ready.
- Crisp the Bottoms (Optional): If you want the bottoms to be extra crispy, remove the lid and cook for another minute or two, until all the water has evaporated and the bottoms are nicely browned.
- Remove and Serve: Carefully remove the potstickers from the skillet and serve immediately with your favorite dipping sauce.
- Combine Ingredients: In a small bowl, combine the soy sauce, rice vinegar, sesame oil, chili garlic sauce, ginger (if using), and green onion (if using).
- Mix Well: Stir all the ingredients together until they are well combined.
- Taste and Adjust: Taste the sauce and adjust the seasonings as needed.
Notes
- Don’t overfill the potstickers.
- Seal the potstickers tightly.
- Use a non-stick skillet.
- Don’t overcrowd the pan.
- The water temperature for the dough is important. Too cold and the dough won’t come together properly, too hot and you risk damaging the gluten development.
- Resting the dough allows the gluten to relax, making the dough easier to roll out later.
- Be careful not to overmix the filling, as this can make it tough.
- The center of the wrapper should be slightly thicker than the edges to prevent the filling from leaking out.


Leave a Comment