
Garlic Bread Rolls: A Culinary Classic
Garlic Bread Rolls: the very words conjure up images of warm, buttery, garlicky goodness, perfect for sharing with loved ones or enjoying as a comforting solo treat. I’ve always been captivated by the simple elegance of this dish; its ability to elevate any meal from ordinary to extraordinary with minimal effort is truly remarkable. And let’s be honest, who doesn’t love the irresistible aroma that fills the kitchen as these rolls bake?
While the exact origins of garlic bread are debated, its popularity spans centuries and cultures. Variations exist across the globe, from the simple bruschetta of Italy to the richly flavored garlic bread found in countless American kitchens. The core concept, however, remains consistent: the magical combination of crusty bread, fragrant garlic, and melted butter. This timeless appeal is what makes Garlic Bread Rolls such a beloved staple.
What makes these Garlic Bread Rolls so irresistible? It’s the perfect harmony of textures and flavors, of course! The soft, pillowy interior of the rolls contrasts beautifully with the crisp, golden-brown exterior. The pungent aroma of garlic blends seamlessly with the richness of the butter, creating a flavor profile that’s both savory and satisfying. And let’s not forget the convenience! These rolls are relatively quick and easy to make, perfect for a weeknight dinner or a casual gathering with friends. Whether you’re a seasoned baker or a kitchen novice, you’ll find this recipe approachable and rewarding.
So, are you ready to embark on a culinary journey and create your own batch of these delightful Garlic Bread Rolls? Let’s get started!

Ingredients:
- 1 cup warm water (105-115°F)
- 2 ¼ teaspoons (1 packet) active dry yeast
- 1 tablespoon granulated sugar
- 1 teaspoon salt
- 4 tablespoons (½ stick) unsalted butter, melted, plus extra for greasing
- 3 cups all-purpose flour, plus more for dusting
- ½ cup grated Parmesan cheese
- ¼ cup chopped fresh parsley
- 4 cloves garlic, minced
- ½ cup (1 stick) unsalted butter, softened
- Salt and freshly ground black pepper to taste
Preparing the Dough
- In a large bowl, combine the warm water, yeast, and sugar. Let stand for 5-10 minutes, or until the yeast is foamy. This ensures your yeast is active and ready to work its magic!
- Stir in the salt and melted butter. The melted butter adds richness and helps the dough come together beautifully.
- Gradually add the flour, one cup at a time, mixing with a wooden spoon or your hands until a shaggy dough forms. Don’t worry if it seems a little sticky at this stage.
- Turn the dough out onto a lightly floured surface and knead for 5-7 minutes, or until the dough is smooth and elastic. This kneading develops the gluten, resulting in a softer, chewier roll.
- Lightly grease a large bowl with oil. Place the dough in the bowl, turning to coat. Cover the bowl with plastic wrap and let rise in a warm place for 1-1.5 hours, or until doubled in size. A warm oven (turned off) is a great place for this!
Mixing in the Flavor
- Once the dough has risen, gently punch it down to release the air. This is a satisfying step, and it helps to even out the dough.
- In a medium bowl, combine the Parmesan cheese, parsley, and minced garlic. The aroma at this point is incredible!
- Add the cheese and herb mixture to the dough and gently knead it in until evenly distributed. Make sure to incorporate all those delicious flavors.
Shaping and Baking the Rolls
- Divide the dough into 12 equal pieces. I usually weigh the dough to ensure even-sized rolls, but you can eyeball it if you prefer.
- Shape each piece of dough into a small ball. Roll each ball gently between your palms to create a smooth surface.
- Place the rolls onto a baking sheet lined with parchment paper, leaving some space between each roll for rising. This prevents them from sticking together.
- Cover the rolls loosely with plastic wrap and let them rise for another 30-45 minutes, or until almost doubled in size. They’ll puff up nicely during this second rise.
- Preheat your oven to 375°F (190°C). While the oven is heating, prepare the garlic butter.
- In a small bowl, combine the softened butter, salt, and pepper. Mix until well combined. You can add a touch of extra garlic powder here if you like a stronger garlic flavor.
- Once the rolls have risen, bake for 15-20 minutes, or until golden brown. Keep an eye on them to prevent burning.
- As soon as the rolls come out of the oven, brush them generously with the garlic butter. This adds extra flavor and keeps them moist.
- Let the rolls cool slightly on a wire rack before serving. Enjoy your warm, delicious garlic bread rolls!
Tips for Perfect Garlic Bread Rolls
- Use fresh ingredients: Fresh herbs and garlic make a big difference in the flavor of these rolls.
- Don’t over-knead the dough: Over-kneading can result in tough rolls.
- Let the dough rise properly: Proper rising is essential for light and fluffy rolls.
- Use a good quality butter: The butter adds richness and flavor to the rolls.
- Experiment with different herbs: Try adding other herbs like oregano, rosemary, or thyme.
- Serve warm: These rolls are best served warm, right out of the oven.
- Store leftovers properly: Store leftover rolls in an airtight container at room temperature for up to 2 days, or freeze them for longer storage.
Conclusion:
So there you have it – my recipe for incredibly delicious Garlic Bread Rolls! I truly believe this recipe is a must-try for anyone who loves the comforting aroma and satisfying taste of warm, garlicky bread. It’s more than just a side dish; it’s an experience. The perfectly fluffy interior, the crisp, golden-brown exterior, and that irresistible garlic-herb butter… it’s a symphony of flavors that will leave you wanting more.
What sets this recipe apart is its simplicity. I’ve carefully crafted it to be accessible to even the most novice bakers, using readily available ingredients and straightforward instructions. Yet, despite its ease, the result is truly impressive. You’ll be amazed at how much flavor you can pack into such a simple recipe. And let’s be honest, who doesn’t love the satisfaction of making something delicious from scratch?
Beyond the basic recipe, the possibilities for customization are endless! This is where you can really get creative and make these Garlic Bread Rolls your own. For a spicier kick, add a pinch of red pepper flakes to the garlic butter. Love cheese? Sprinkle some Parmesan or mozzarella over the rolls before baking for an extra cheesy delight. Feeling adventurous? Experiment with different herbs – rosemary, thyme, or oregano would all complement the garlic beautifully. You could even incorporate sun-dried tomatoes into the garlic butter for a Mediterranean twist.
I’ve personally enjoyed serving these Garlic Bread Rolls alongside a variety of dishes. They’re the perfect accompaniment to hearty soups, such as creamy tomato soup or a robust minestrone. They pair wonderfully with pasta dishes, especially those with rich tomato-based sauces. And let’s not forget their amazing ability to elevate a simple salad into a truly memorable meal. They’re equally delicious served warm as an appetizer or alongside a main course.
Serving Suggestions:
- Alongside your favorite pasta dish
- With a hearty bowl of soup
- As a side to grilled meats or vegetables
- As part of a delicious antipasto platter
- Served warm with a side salad
I encourage you to give this recipe a try and experience the magic of homemade Garlic Bread Rolls for yourself. It’s a recipe that’s guaranteed to become a staple in your kitchen. Once you’ve mastered it, I’d love to hear about your experience! Share your photos and feedback on social media using #GarlicBreadRolls – I can’t wait to see your creations. Let’s connect and share our love for this incredibly versatile and delicious bread!
Remember, baking is a journey of discovery. Don’t be afraid to experiment and adapt the recipe to your own taste preferences. The most important thing is to have fun and enjoy the process of creating something delicious. Happy baking!
Don’t forget to share your amazing Garlic Bread Rolls creations with me!
Garlic Bread Rolls: The Ultimate Recipe and Baking Guide
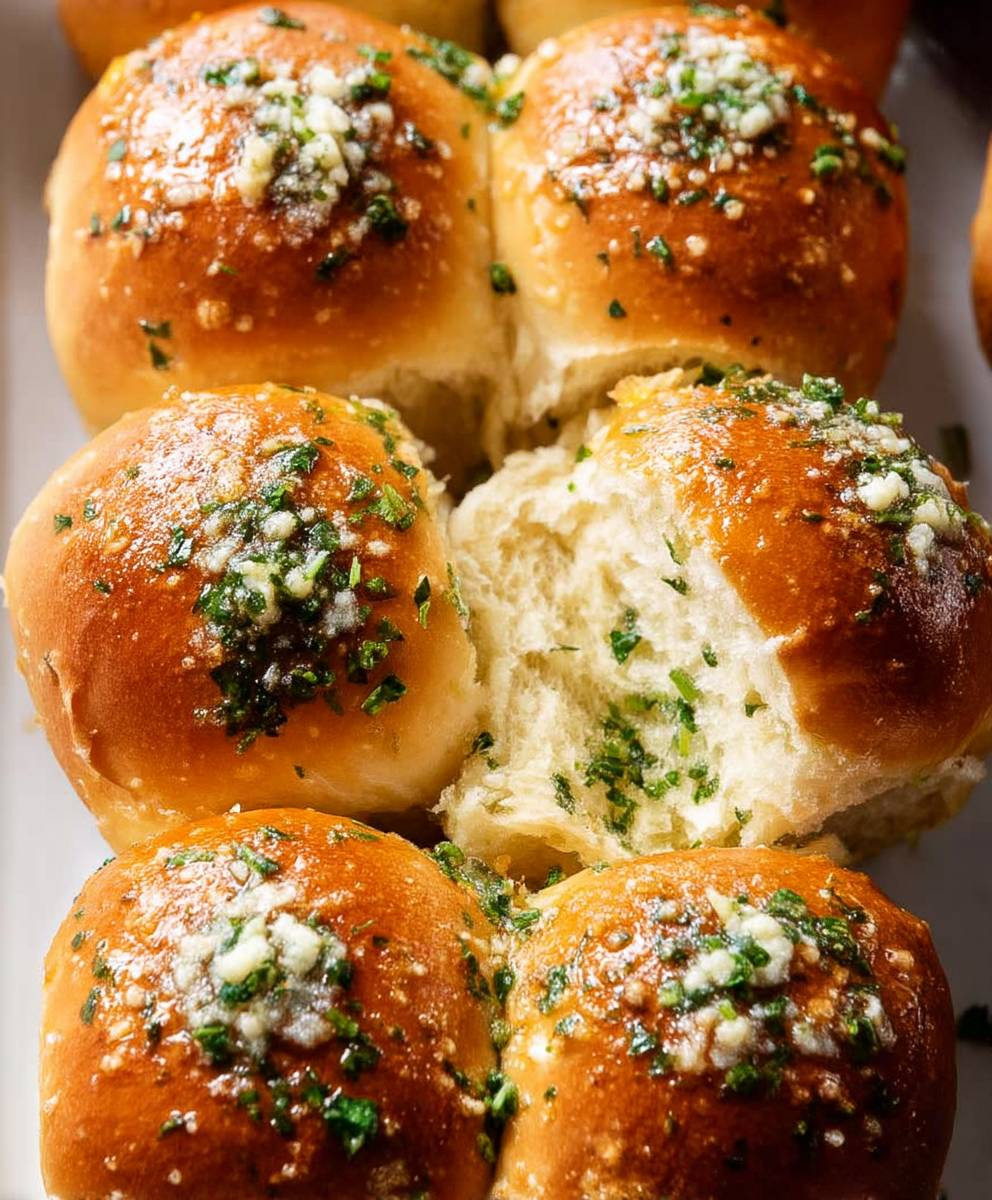
Soft, fluffy bread rolls packed with garlic, Parmesan, and parsley, brushed with garlic butter.
Ingredients
- 1 cup warm water (105-115°F)
- 2 ¼ teaspoons (1 packet) active dry yeast
- 1 tablespoon granulated sugar
- 1 teaspoon salt
- 4 tablespoons (½ stick) unsalted butter, melted, plus extra for greasing
- 3 cups all-purpose flour, plus more for dusting
- ½ cup grated Parmesan cheese
- ¼ cup chopped fresh parsley
- 4 cloves garlic, minced
- ½ cup (1 stick) unsalted butter, softened
- Salt and freshly ground black pepper to taste
Instructions
- In a large bowl, combine warm water, yeast, and sugar. Let stand 5-10 minutes until foamy.
- Stir in salt and melted butter.
- Gradually add flour, one cup at a time, mixing until a shaggy dough forms.
- Turn dough onto a lightly floured surface and knead 5-7 minutes until smooth and elastic.
- Grease a large bowl with oil. Place dough in bowl, turning to coat. Cover and let rise in a warm place 1-1.5 hours, or until doubled.
- Gently punch down risen dough.
- In a medium bowl, combine Parmesan cheese, parsley, and minced garlic.
- Add cheese and herb mixture to dough and knead until evenly distributed.
- Divide dough into 12 equal pieces.
- Shape each piece into a small ball.
- Place rolls onto a baking sheet lined with parchment paper, leaving space between.
- Cover loosely with plastic wrap and let rise 30-45 minutes, or until almost doubled.
- Preheat oven to 375°F (190°C).
- In a small bowl, combine softened butter, salt, and pepper.
- Bake rolls 15-20 minutes, or until golden brown.
- Immediately brush with garlic butter.
- Let cool slightly on a wire rack before serving.
Notes
- Use fresh ingredients for best flavor.
- Don’t over-knead the dough.
- Proper rising is crucial for light and fluffy rolls.
- Use good quality butter.
- Experiment with different herbs (oregano, rosemary, thyme).
- Serve warm.
- Store leftovers in an airtight container at room temperature up to 2 days, or freeze for longer storage.
- Weighing the dough for even-sized rolls is recommended.
- A warm oven (turned off) is an ideal place for the first rise.
- You can add extra garlic powder to the garlic butter for a stronger garlic flavor.
Leave a Comment