
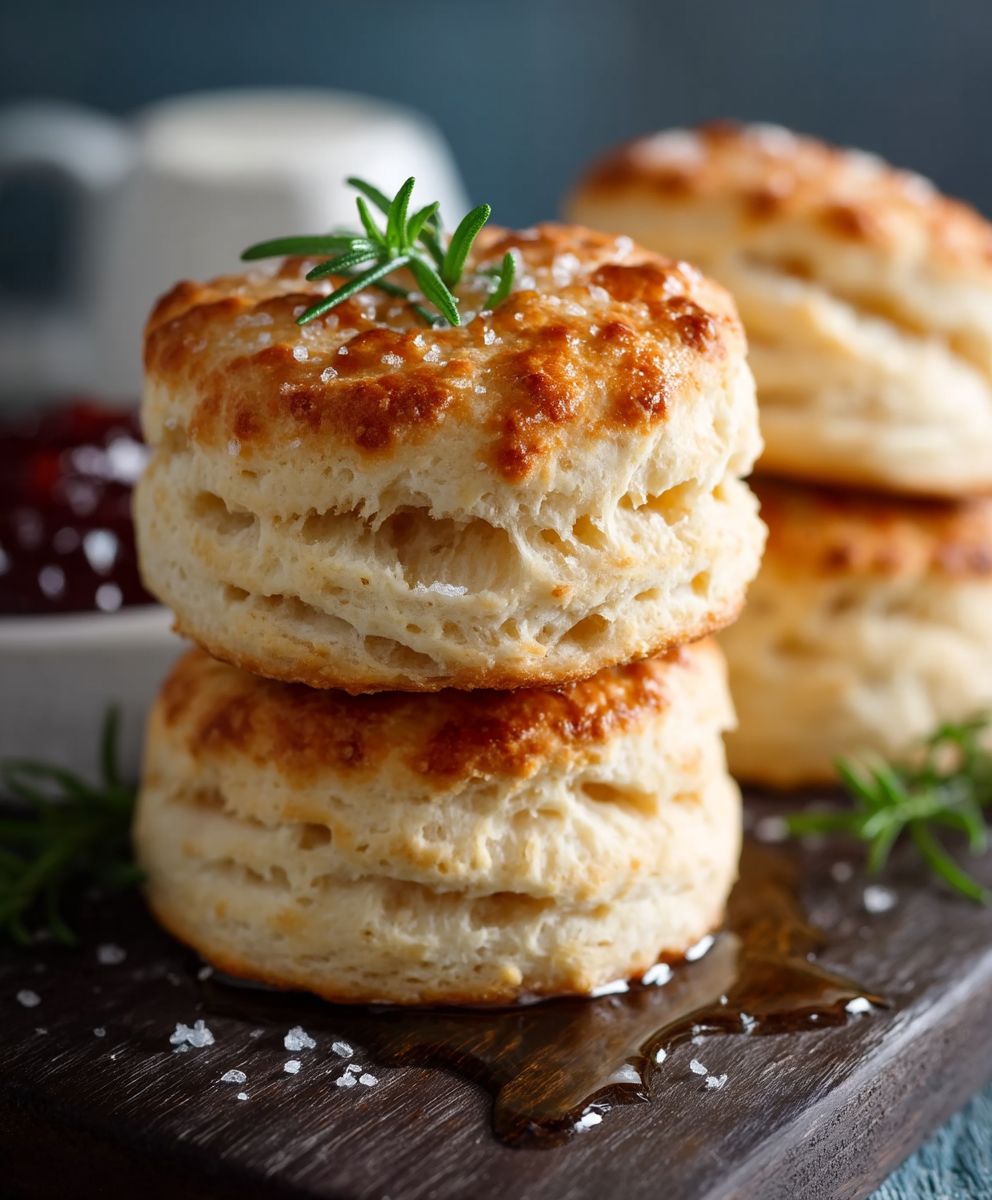
Homemade Biscuits, warm from the oven, are a simple pleasure that transcends generations. Is there anything quite as comforting as the aroma of freshly baked biscuits wafting through your kitchen? I think not! These aren’t just any biscuits; they’re a taste of home, a reminder of Sunday mornings, and a testament to the magic that happens when flour, butter, and a little bit of love come together.
Biscuits have a rich history in American cuisine, evolving from hardtack brought over by early settlers to the soft, fluffy delights we know and love today. They were a staple in the South, providing sustenance and comfort during challenging times. Over time, each family developed their own unique twist, passing down secret ingredients and techniques from one generation to the next.
People adore Homemade Biscuits for their versatility and comforting nature. Their slightly crisp exterior gives way to a soft, pillowy interior that practically melts in your mouth. Whether slathered with butter and jam, used as a base for savory breakfast sandwiches, or served alongside a hearty stew, biscuits are the perfect accompaniment to any meal. Plus, with this easy-to-follow recipe, you can whip up a batch in no time, making them a convenient and satisfying treat for any occasion. Get ready to experience the joy of baking and savor the deliciousness of homemade goodness!

Ingredients:
- 2 cups all-purpose flour, plus more for dusting
- 1 tablespoon baking powder
- 1 teaspoon baking soda
- 1 teaspoon salt
- 1/2 cup (1 stick) cold unsalted butter, cut into small cubes
- 3/4 cup cold buttermilk, plus more for brushing
- 2 tablespoons honey (optional, for a touch of sweetness)
Preparing the Dough: The Key to Flaky Biscuits
Alright, let’s get started! Making biscuits from scratch might seem intimidating, but trust me, it’s easier than you think. The secret to those light and fluffy layers is all in keeping everything cold and handling the dough gently. So, let’s dive in!
- Combine the Dry Ingredients: In a large bowl, whisk together the 2 cups of all-purpose flour, 1 tablespoon of baking powder, 1 teaspoon of baking soda, and 1 teaspoon of salt. Make sure everything is well combined. This ensures that the leavening agents are evenly distributed, which is crucial for a good rise.
- Cut in the Butter: This is where the magic happens! Add the 1/2 cup (1 stick) of cold, cubed butter to the flour mixture. Using a pastry blender or your fingertips (work quickly!), cut the butter into the flour until the mixture resembles coarse crumbs. You should still see small pieces of butter throughout – these little pockets of butter will create steam in the oven, resulting in those beautiful flaky layers we’re after. Don’t overmix! Overmixing will develop the gluten in the flour, leading to tough biscuits.
- Add the Buttermilk: Gradually pour in the 3/4 cup of cold buttermilk, and if you’re using it, the 2 tablespoons of honey. Gently stir with a fork until just combined. The dough will be shaggy and a little sticky – that’s perfectly fine! Resist the urge to overmix. Again, we want to avoid developing too much gluten.
- Turn Out and Knead (Briefly!): Lightly flour a clean work surface. Turn the dough out onto the floured surface. Gently pat the dough into a rectangle about 1 inch thick. Now, here’s the important part: we’re not going to knead this dough like bread dough. Instead, we’re going to do a series of folds to create even more layers. Fold the dough in thirds, like you’re folding a letter. Then, turn the dough 90 degrees and repeat the folding process. This is called a “laminate” and it’s what gives the biscuits their signature flaky texture.
- Pat and Cut: Gently pat the dough out to about 3/4 inch to 1 inch thickness. Use a 2-inch biscuit cutter (or a sharp knife) to cut out the biscuits. When cutting, press straight down – avoid twisting the cutter, as this can seal the edges and prevent the biscuits from rising properly.
- Arrange on Baking Sheet: Place the biscuits on an ungreased baking sheet, spacing them about 1 inch apart. For softer-sided biscuits, place them close together. For crispier sides, space them further apart.
- Brush with Buttermilk: Brush the tops of the biscuits with a little extra buttermilk. This will help them brown beautifully in the oven.
Baking to Golden Perfection
Now that our biscuits are shaped and ready, it’s time to bake them to golden-brown perfection. The oven temperature is key here, so make sure yours is properly calibrated.
- Preheat the Oven: Preheat your oven to 450°F (232°C). A hot oven is essential for creating that rapid rise and flaky texture.
- Bake: Bake for 12-15 minutes, or until the biscuits are golden brown on top. Keep a close eye on them, as baking times can vary depending on your oven.
- Cool Slightly: Remove the biscuits from the oven and let them cool on the baking sheet for a few minutes before serving. This allows them to set up slightly.
Tips and Tricks for Biscuit Success
Here are a few extra tips to ensure your biscuits turn out perfect every time:
- Keep Everything Cold: I can’t stress this enough! Cold butter and buttermilk are crucial for creating those flaky layers. You can even chill your flour and bowl before starting.
- Don’t Overmix: Overmixing develops the gluten in the flour, resulting in tough biscuits. Mix the dough just until the ingredients are combined.
- Handle the Dough Gently: Be gentle when patting and cutting the dough. Avoid pressing down too hard, as this can compress the layers.
- Use a Biscuit Cutter: A biscuit cutter will give you uniform biscuits with clean edges. If you don’t have a biscuit cutter, you can use a sharp knife.
- Experiment with Flavors: Once you’ve mastered the basic biscuit recipe, feel free to experiment with different flavors. You can add cheese, herbs, or spices to the dough.
- Freezing Biscuits: You can freeze unbaked biscuits for later use. Simply place the cut biscuits on a baking sheet and freeze until solid. Then, transfer them to a freezer bag and store for up to 2 months. When ready to bake, bake directly from frozen, adding a few extra minutes to the baking time.
Serving Suggestions
These homemade biscuits are delicious served warm with butter, jam, or honey. They’re also great for making breakfast sandwiches or serving alongside your favorite soups and stews. Here are a few ideas:
- Classic: Serve warm with butter and your favorite jam or honey.
- Breakfast Sandwich: Split a biscuit in half and fill it with scrambled eggs, bacon, and cheese.
- Biscuits and Gravy: Top with creamy sausage gravy for a hearty and satisfying meal.
- Side Dish: Serve alongside soups, stews, or chili.
- Strawberry Shortcake: Use biscuits instead of traditional shortcake for a delicious twist.
Troubleshooting Common Biscuit Problems
Sometimes, even with the best intentions, things can go wrong. Here’s a quick guide to troubleshooting common biscuit problems:
- Flat Biscuits: This is usually caused by using old baking powder or not enough leavening. Make sure your baking powder is fresh and that you’re using the correct amount. Also, ensure your oven is hot enough.
- Tough Biscuits: This is usually caused by overmixing the dough. Remember to mix the dough just until the ingredients are combined.
- Dry Biscuits: This can be caused by using too much flour or not enough buttermilk. Make sure you’re measuring your ingredients accurately.
- Unevenly Baked Biscuits: This can be caused by an unevenly heated oven. Rotate the baking sheet halfway through baking.
Variations to Try
Once you’ve mastered the basic biscuit recipe, the possibilities are endless! Here are a few variations to try:
- Cheese Biscuits: Add 1/2 cup of shredded cheddar cheese to the dry ingredients.
- Herb Biscuits: Add 1 tablespoon of chopped fresh herbs, such as rosemary, thyme, or chives, to the dry ingredients.
- Sweet Potato Biscuits: Substitute 1/2 cup of mashed sweet potato for 1/2 cup of buttermilk.
- Cheddar Jalapeño Biscuits: Add 1/2 cup of shredded cheddar cheese and 1-2 tablespoons of finely chopped jalapeños to the dry ingredients.
- Garlic Herb Biscuits: Add 1 tablespoon of garlic powder and 1 tablespoon of chopped fresh herbs to the dry ingredients.
Why This Recipe Works
This recipe is designed to be foolproof, even for beginner bakers. The key is in the technique: keeping the ingredients cold, avoiding overmixing, and using the folding method to create layers. By following these simple steps, you’ll be able to bake light, fluffy, and delicious biscuits every time. The addition of honey is optional, but it adds a subtle sweetness that complements the savory flavors of the biscuits perfectly. The buttermilk provides moisture and tang, contributing to the overall flavor and texture. And remember, practice makes perfect! The more you bake biscuits, the better you’ll become at judging the consistency of the dough and adjusting the baking time to your oven.
Enjoy Your Homemade Biscuits!
Conclusion:
And there you have it! These homemade biscuits are more than just a recipe; they’re an experience. From the satisfying crumble as you mix the ingredients to the heavenly aroma that fills your kitchen as they bake, every step is a testament to the simple joy of homemade goodness. I truly believe that once you’ve tasted a biscuit fresh from your own oven, you’ll never settle for store-bought again.
But why are these biscuits a must-try? It’s simple: they’re incredibly versatile, unbelievably delicious, and surprisingly easy to make. Forget complicated techniques and fancy ingredients. This recipe uses pantry staples and straightforward instructions, making it perfect for both seasoned bakers and kitchen novices. The result is a batch of light, fluffy, and buttery biscuits that will impress everyone who tries them.
Think of the possibilities! These biscuits are fantastic on their own, slathered with butter and your favorite jam. But they also shine as part of a larger meal. Imagine them alongside a hearty bowl of chili on a cold winter evening, or as the base for a delicious breakfast sandwich filled with eggs, bacon, and cheese. For a truly Southern experience, serve them with sausage gravy – a classic combination that’s guaranteed to satisfy.
And don’t be afraid to experiment! Feel free to add your own personal touch to the recipe. For a savory twist, try incorporating shredded cheddar cheese, chopped chives, or even a sprinkle of garlic powder into the dough. If you’re craving something sweet, a touch of cinnamon and sugar can transform these biscuits into a delightful treat. You could even add blueberries or cranberries for a burst of fruity flavor. The possibilities are endless!
Here are a few more serving suggestions to get your creative juices flowing:
* Biscuit Benedict: Top a split biscuit with Canadian bacon, a poached egg, and hollandaise sauce for a decadent brunch.
* Strawberry Shortcake Biscuits: Use these biscuits as the base for a classic strawberry shortcake, topped with fresh strawberries and whipped cream.
* Mini Biscuit Pizzas: Flatten the biscuit dough into small circles, top with your favorite pizza toppings, and bake for a fun and easy snack.
* Chicken Pot Pie Topper: Instead of a traditional pie crust, use these biscuits to top a homemade chicken pot pie for a comforting and flavorful meal.
* Biscuits and Honey Butter: Whip together softened butter with honey and a pinch of salt for a sweet and savory spread that perfectly complements the biscuits.
I’m confident that you’ll love these homemade biscuits as much as I do. They’re a comforting classic that’s perfect for any occasion. So, gather your ingredients, preheat your oven, and get ready to experience the magic of homemade baking.
I can’t wait to hear about your baking adventures! Once you’ve tried this recipe, please come back and share your experience in the comments below. Let me know what variations you tried, what you served them with, and any tips or tricks you discovered along the way. Happy baking!
Homemade Biscuits: The Ultimate Guide to Fluffy Perfection
Flaky, homemade biscuits made from scratch. Light, fluffy, and perfect for breakfast, lunch, or dinner. Keeping ingredients cold and handling dough gently is key.
Ingredients
- 2 cups all-purpose flour, plus more for dusting
- 1 tablespoon baking powder
- 1 teaspoon baking soda
- 1 teaspoon salt
- 1/2 cup (1 stick) cold unsalted butter, cut into small cubes
- 3/4 cup cold buttermilk, plus more for brushing
- 2 tablespoons honey (optional, for a touch of sweetness)
Instructions
- Combine Dry Ingredients: In a large bowl, whisk together flour, baking powder, baking soda, and salt.
- Cut in Butter: Add cold, cubed butter to the flour mixture. Using a pastry blender or fingertips, cut the butter into the flour until the mixture resembles coarse crumbs.
- Add Buttermilk: Gradually pour in cold buttermilk and honey (if using). Gently stir with a fork until just combined. The dough will be shaggy and a little sticky.
- Turn Out and Knead (Briefly!): Lightly flour a clean work surface. Turn the dough out onto the floured surface. Gently pat the dough into a rectangle about 1 inch thick. Fold the dough in thirds, like you’re folding a letter. Then, turn the dough 90 degrees and repeat the folding process.
- Pat and Cut: Gently pat the dough out to about 3/4 inch to 1 inch thickness. Use a 2-inch biscuit cutter (or a sharp knife) to cut out the biscuits. Press straight down – avoid twisting the cutter.
- Arrange on Baking Sheet: Place the biscuits on an ungreased baking sheet, spacing them about 1 inch apart.
- Brush with Buttermilk: Brush the tops of the biscuits with a little extra buttermilk.
- Preheat Oven: Preheat your oven to 450°F (232°C).
- Bake: Bake for 12-15 minutes, or until the biscuits are golden brown on top.
- Cool Slightly: Remove the biscuits from the oven and let them cool on the baking sheet for a few minutes before serving.
Notes
- Keep all ingredients cold for best results.
- Don’t overmix the dough.
- Handle the dough gently.
- For softer-sided biscuits, place them close together on the baking sheet. For crispier sides, space them further apart.
- Experiment with flavors by adding cheese, herbs, or spices to the dough.
- Unbaked biscuits can be frozen for later use.

Leave a Comment