
Gluten Free American Flag Cake: Is there a more patriotic and delicious way to celebrate the 4th of July? I think not! Imagine sinking your teeth into a moist, tender cake, bursting with fresh berries and adorned with a creamy, dreamy frosting – all while proudly displaying the stars and stripes. This isn’t just dessert; it’s a showstopper that will have everyone reaching for seconds (and maybe thirds!).
The American Flag Cake has become a beloved tradition, symbolizing national pride and festive gatherings. While its exact origins are difficult to pinpoint, the concept of decorating cakes with patriotic symbols has been around for generations. It’s a visual representation of our shared history and a delicious way to commemorate Independence Day.
What makes this Gluten Free American Flag Cake so irresistible? Beyond its stunning appearance, it’s the perfect combination of flavors and textures. The sweetness of the cake complements the tartness of the berries, while the frosting adds a luscious creaminess that ties everything together. And because it’s gluten-free, everyone can enjoy a slice of this patriotic masterpiece! Whether you’re a seasoned baker or a kitchen novice, this recipe is surprisingly easy to follow, guaranteeing a crowd-pleasing dessert that will be the highlight of your holiday celebration. Get ready to impress your friends and family with this unforgettable treat!

Ingredients:
- For the Gluten-Free Vanilla Cake:
- 2 ½ cups gluten-free all-purpose flour blend (with xanthan gum)
- 1 ½ cups granulated sugar
- 3 ½ teaspoons baking powder
- 1 teaspoon salt
- 1 cup (2 sticks) unsalted butter, softened
- 1 ¼ cups milk
- 2 large eggs
- 2 teaspoons vanilla extract
- For the Gluten-Free Red Velvet Cake:
- 2 ½ cups gluten-free all-purpose flour blend (with xanthan gum)
- 1 ½ cups granulated sugar
- 1 teaspoon baking soda
- 1 teaspoon baking powder
- 1 teaspoon salt
- 2 tablespoons unsweetened cocoa powder
- 1 teaspoon red food coloring (gel is best)
- 1 cup buttermilk
- ½ cup vegetable oil
- 2 large eggs
- 1 teaspoon vanilla extract
- 1 teaspoon white vinegar
- For the Cream Cheese Frosting:
- 16 ounces cream cheese, softened
- 1 cup (2 sticks) unsalted butter, softened
- 6 cups powdered sugar
- 2 teaspoons vanilla extract
- 2-4 tablespoons milk or heavy cream (for desired consistency)
- For the Decoration:
- 1 cup fresh blueberries
- 1 cup fresh raspberries (or strawberries, hulled and halved)
Preparing the Gluten-Free Vanilla Cake:
- Preheat and Prepare: Preheat your oven to 350°F (175°C). Grease and flour a 9×13 inch baking pan. I like to use gluten-free flour for dusting to avoid any sticking.
- Combine Dry Ingredients: In a large bowl, whisk together the gluten-free flour, sugar, baking powder, and salt. Make sure everything is evenly distributed.
- Cream Butter and Add Wet Ingredients: Add the softened butter to the dry ingredients. Using an electric mixer, beat until the mixture resembles coarse crumbs. Gradually add the milk, mixing until just combined.
- Add Eggs and Vanilla: Add the eggs one at a time, mixing well after each addition. Stir in the vanilla extract. Be careful not to overmix at this stage.
- Pour into Pan and Bake: Pour the vanilla cake batter into the prepared baking pan, spreading it evenly. Bake for 30-35 minutes, or until a wooden skewer inserted into the center comes out clean.
- Cool Completely: Let the cake cool in the pan for 10 minutes before inverting it onto a wire rack to cool completely. This is important to prevent the cake from breaking.
Preparing the Gluten-Free Red Velvet Cake:
- Preheat and Prepare: Preheat your oven to 350°F (175°C). Grease and flour a 9×13 inch baking pan. Again, gluten-free flour is your friend here!
- Combine Dry Ingredients: In a large bowl, whisk together the gluten-free flour, sugar, baking soda, baking powder, salt, and cocoa powder.
- Combine Wet Ingredients: In a separate bowl, whisk together the buttermilk, vegetable oil, eggs, vanilla extract, red food coloring, and white vinegar. The vinegar helps activate the baking soda and gives the cake its characteristic tang.
- Combine Wet and Dry: Gradually add the wet ingredients to the dry ingredients, mixing until just combined. Be careful not to overmix.
- Pour into Pan and Bake: Pour the red velvet cake batter into the prepared baking pan, spreading it evenly. Bake for 30-35 minutes, or until a wooden skewer inserted into the center comes out clean.
- Cool Completely: Let the cake cool in the pan for 10 minutes before inverting it onto a wire rack to cool completely.
Making the Cream Cheese Frosting:
- Cream Cheese and Butter: In a large bowl, beat the softened cream cheese and butter together with an electric mixer until smooth and creamy. This is crucial for a lump-free frosting.
- Add Powdered Sugar: Gradually add the powdered sugar, one cup at a time, beating well after each addition. Start on low speed to prevent a powdered sugar cloud!
- Add Vanilla and Milk: Stir in the vanilla extract. Add milk or heavy cream, one tablespoon at a time, until you reach your desired consistency. I prefer a thick but spreadable frosting.
- Whip Until Fluffy: Continue to beat the frosting for 2-3 minutes until it is light and fluffy.
Assembling the American Flag Cake:
- Level the Cakes: Once both cakes are completely cool, use a long serrated knife to level the tops of the cakes. This will ensure a flat surface for frosting and decorating.
- Cut the Vanilla Cake: Cut the vanilla cake into a rectangle that is approximately 1/3 of the 9×13 inch pan. This will be the “stars” section of the flag.
- Position the Cakes: Place the red velvet cake in the 9×13 inch pan. Place the cut vanilla cake rectangle in the upper left corner of the pan, adjacent to the red velvet cake.
- Frost the Entire Cake: Generously frost the entire cake with the cream cheese frosting. Make sure to cover all surfaces evenly.
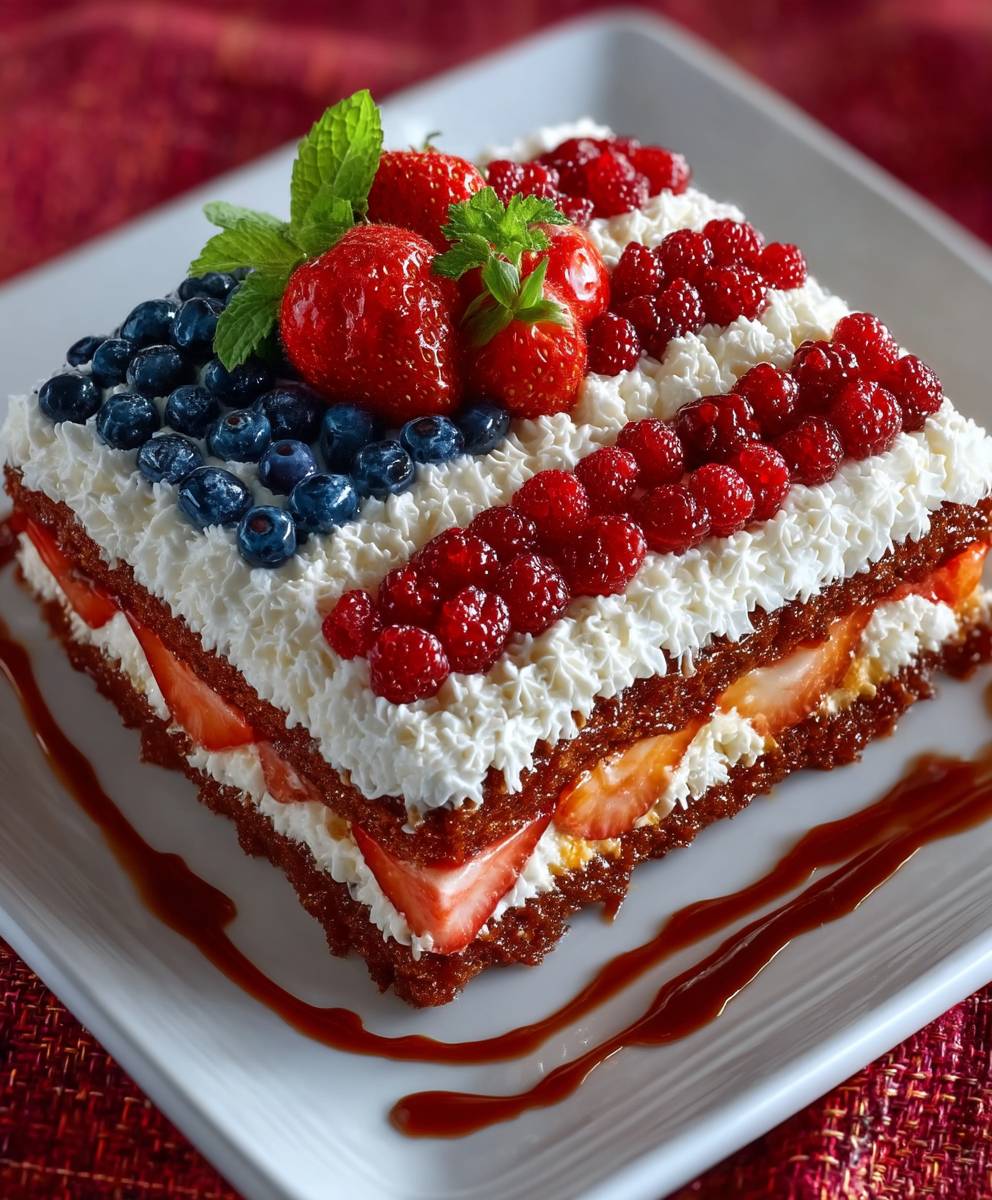
- Create the Stars: Arrange the fresh blueberries in the upper left corner of the vanilla cake rectangle to create the “stars” of the flag. I like to start with the outer edges and work my way in.
- Create the Stripes: Arrange the fresh raspberries (or strawberries) in horizontal rows across the red velvet cake to create the “stripes” of the flag. Alternate rows of red berries and white frosting to achieve the striped effect. You can use a piping bag to create neat frosting stripes, or simply spread the frosting with a spatula.
- Chill and Serve: Refrigerate the cake for at least 30 minutes before serving to allow the frosting to set. This will make it easier to slice and serve.
Tips for Success:
- Gluten-Free Flour Blend: Using a good quality gluten-free all-purpose flour blend with xanthan gum is essential for the texture of the cake. Different blends may yield slightly different results, so experiment to find your favorite.
- Softened Ingredients: Make sure your butter and cream cheese are properly softened before starting. This will ensure a smooth and creamy frosting.
- Don’t Overmix: Overmixing the cake batter can result in a tough cake. Mix until just combined.
- Cooling Time: Allow the cakes to cool completely before frosting. This will prevent the frosting from melting.
- Fruit Freshness: Use fresh, high-quality blueberries and raspberries (or strawberries) for the best flavor and appearance.
- Frosting Consistency: Adjust the amount of milk or heavy cream in the frosting to achieve your desired consistency.
Variations:
- Different Berries: Feel free to use other types of berries, such as blackberries or mixed berries, to decorate the cake.
- Food Coloring: If you prefer not to use artificial food coloring, you can use beet juice or other natural food colorings for the red velvet cake. However, the color may not be as vibrant.
- Frosting Flavor: Add a few drops of lemon extract or almond extract to the cream cheese frosting for a different flavor profile.
- Cake Layers: For a more elaborate cake, you can bake the vanilla and red velvet cakes in separate pans and create a layered cake with frosting in between the layers.
- Individual Cupcakes: This recipe can also be used to make gluten-free American flag cupcakes. Simply bake the batter in cupcake liners and decorate with frosting and berries.
Storage Instructions:
- Store the frosted cake in the refrigerator for up to 3 days. Cover it loosely with plastic wrap to prevent it from drying out.
- The unfrosted cakes can be stored at room temperature for up to 2 days, or in the refrigerator for up to 5 days. Wrap them tightly in plastic wrap to prevent them from drying out.
- The cream cheese frosting can be stored in the refrigerator for up to 5 days. Let it come to room temperature before using.
Conclusion:
This Gluten Free American Flag Cake isn’t just a dessert; it’s a statement! It’s a delicious, show-stopping centerpiece perfect for any patriotic celebration, from the Fourth of July to Memorial Day, or even just a fun summer barbecue. The moist, tender cake, combined with the sweet and tangy berry topping and creamy frosting, creates a symphony of flavors that will have everyone reaching for seconds (and maybe even thirds!).
I know baking gluten-free can sometimes feel intimidating, but trust me, this recipe is surprisingly easy to follow. I’ve included all the tips and tricks I’ve learned over the years to ensure your cake turns out perfectly every single time. The vibrant colors of the berries make it visually stunning, and the fact that it’s gluten-free means everyone can enjoy a slice of this patriotic goodness.
But the best part? It’s incredibly versatile! While I’ve outlined the classic American flag design, feel free to get creative with your decorations. You could use different types of berries, add a sprinkle of edible glitter for extra sparkle, or even create a different patriotic design altogether.
Serving Suggestions & Variations:
* A la Mode: Serve each slice with a scoop of vanilla ice cream or whipped cream for an extra decadent treat. The coldness of the ice cream perfectly complements the warm cake.
* Berry Compote: Drizzle a homemade berry compote over the cake for an intensified berry flavor. Simply simmer your favorite berries with a little sugar and lemon juice until thickened.
* Citrus Zest: Add a touch of lemon or orange zest to the cake batter for a brighter, more citrusy flavor.
* Chocolate Chips: Fold in some mini chocolate chips into the cake batter for a chocolatey twist.
* Individual Cupcakes: Bake the batter in cupcake tins for individual servings. Decorate each cupcake with a mini American flag or a swirl of frosting and berries.
* Layered Parfaits: Crumble the cake and layer it with berries, yogurt, and granola in parfait glasses for a lighter, breakfast-friendly option.
* Boozy Berries: Macerate the berries in a little bit of rum or Grand Marnier for an adult-friendly version.
* Frosting Fun: Experiment with different frosting flavors! A cream cheese frosting, lemon buttercream, or even a chocolate ganache would all be delicious alternatives.
I truly believe this Gluten Free American Flag Cake will become a new family favorite. It’s more than just a recipe; it’s a way to celebrate our country and create lasting memories with loved ones. The joy of baking and sharing something delicious is truly special, and I hope this recipe brings you that joy.
So, what are you waiting for? Gather your ingredients, preheat your oven, and get ready to bake! I’m confident you’ll be amazed at how easy and delicious this cake is. And most importantly, I’d love to hear about your experience! Please, share your photos, tips, and variations in the comments below. Let’s create a community of gluten-free bakers who are passionate about celebrating with delicious, homemade treats. Happy baking, and happy celebrating! I can’t wait to see your amazing creations! Don’t forget to tag me in your photos on social media so I can see your beautiful Gluten Free American Flag Cake masterpieces!
Gluten Free American Flag Cake: A Delicious & Festive Recipe
A festive and delicious gluten-free American Flag Cake featuring a vanilla "stars" section, red velvet "stripes," creamy cream cheese frosting, and fresh berries. Perfect for patriotic celebrations!
Ingredients
- 2 ½ cups gluten-free all-purpose flour blend (with xanthan gum)
- 1 ½ cups granulated sugar
- 3 ½ teaspoons baking powder
- 1 teaspoon salt
- 1 cup (2 sticks) unsalted butter, softened
- 1 ¼ cups milk
- 2 large eggs
- 2 teaspoons vanilla extract
- 2 ½ cups gluten-free all-purpose flour blend (with xanthan gum)
- 1 ½ cups granulated sugar
- 1 teaspoon baking soda
- 1 teaspoon baking powder
- 1 teaspoon salt
- 2 tablespoons unsweetened cocoa powder
- 1 teaspoon red food coloring (gel is best)
- 1 cup buttermilk
- ½ cup vegetable oil
- 2 large eggs
- 1 teaspoon vanilla extract
- 1 teaspoon white vinegar
- 16 ounces cream cheese, softened
- 1 cup (2 sticks) unsalted butter, softened
- 6 cups powdered sugar
- 2 teaspoons vanilla extract
- 2-4 tablespoons milk or heavy cream (for desired consistency)
- 1 cup fresh blueberries
- 1 cup fresh raspberries (or strawberries, hulled and halved)
Instructions
- Preheat your oven to 350°F (175°C). Grease and flour a 9×13 inch baking pan. I like to use gluten-free flour for dusting to avoid any sticking.
- In a large bowl, whisk together the gluten-free flour, sugar, baking powder, and salt. Make sure everything is evenly distributed.
- Add the softened butter to the dry ingredients. Using an electric mixer, beat until the mixture resembles coarse crumbs. Gradually add the milk, mixing until just combined.
- Add the eggs one at a time, mixing well after each addition. Stir in the vanilla extract. Be careful not to overmix at this stage.
- Pour the vanilla cake batter into the prepared baking pan, spreading it evenly. Bake for 30-35 minutes, or until a wooden skewer inserted into the center comes out clean.
- Let the cake cool in the pan for 10 minutes before inverting it onto a wire rack to cool completely. This is important to prevent the cake from breaking.
- Preheat your oven to 350°F (175°C). Grease and flour a 9×13 inch baking pan. Again, gluten-free flour is your friend here!
- In a large bowl, whisk together the gluten-free flour, sugar, baking soda, baking powder, salt, and cocoa powder.
- In a separate bowl, whisk together the buttermilk, vegetable oil, eggs, vanilla extract, red food coloring, and white vinegar. The vinegar helps activate the baking soda and gives the cake its characteristic tang.
- Gradually add the wet ingredients to the dry ingredients, mixing until just combined. Be careful not to overmix.
- Pour the red velvet cake batter into the prepared baking pan, spreading it evenly. Bake for 30-35 minutes, or until a wooden skewer inserted into the center comes out clean.
- Let the cake cool in the pan for 10 minutes before inverting it onto a wire rack to cool completely.
- In a large bowl, beat the softened cream cheese and butter together with an electric mixer until smooth and creamy. This is crucial for a lump-free frosting.
- Gradually add the powdered sugar, one cup at a time, beating well after each addition. Start on low speed to prevent a powdered sugar cloud!
- Stir in the vanilla extract. Add milk or heavy cream, one tablespoon at a time, until you reach your desired consistency. I prefer a thick but spreadable frosting.
- Continue to beat the frosting for 2-3 minutes until it is light and fluffy.
- Once both cakes are completely cool, use a long serrated knife to level the tops of the cakes. This will ensure a flat surface for frosting and decorating.
- Cut the vanilla cake into a rectangle that is approximately 1/3 of the 9×13 inch pan. This will be the “stars” section of the flag.
- Place the red velvet cake in the 9×13 inch pan. Place the cut vanilla cake rectangle in the upper left corner of the pan, adjacent to the red velvet cake.
- Generously frost the entire cake with the cream cheese frosting. Make sure to cover all surfaces evenly.
- Arrange the fresh blueberries in the upper left corner of the vanilla cake rectangle to create the “stars” of the flag. I like to start with the outer edges and work my way in.
- Arrange the fresh raspberries (or strawberries) in horizontal rows across the red velvet cake to create the “stripes” of the flag. Alternate rows of red berries and white frosting to achieve the striped effect. You can use a piping bag to create neat frosting stripes, or simply spread the frosting with a spatula.
- Refrigerate the cake for at least 30 minutes before serving to allow the frosting to set. This will make it easier to slice and serve.
Notes
- Using a good quality gluten-free all-purpose flour blend with xanthan gum is essential for the texture of the cake. Different blends may yield slightly different results, so experiment to find your favorite.
- Make sure your butter and cream cheese are properly softened before starting. This will ensure a smooth and creamy frosting.
- Overmixing the cake batter can result in a tough cake. Mix until just combined.
- Allow the cakes to cool completely before frosting. This will prevent the frosting from melting.
- Use fresh, high-quality blueberries and raspberries (or strawberries) for the best flavor and appearance.
- Adjust the amount of milk or heavy cream in the frosting to achieve your desired consistency.
Leave a Comment