

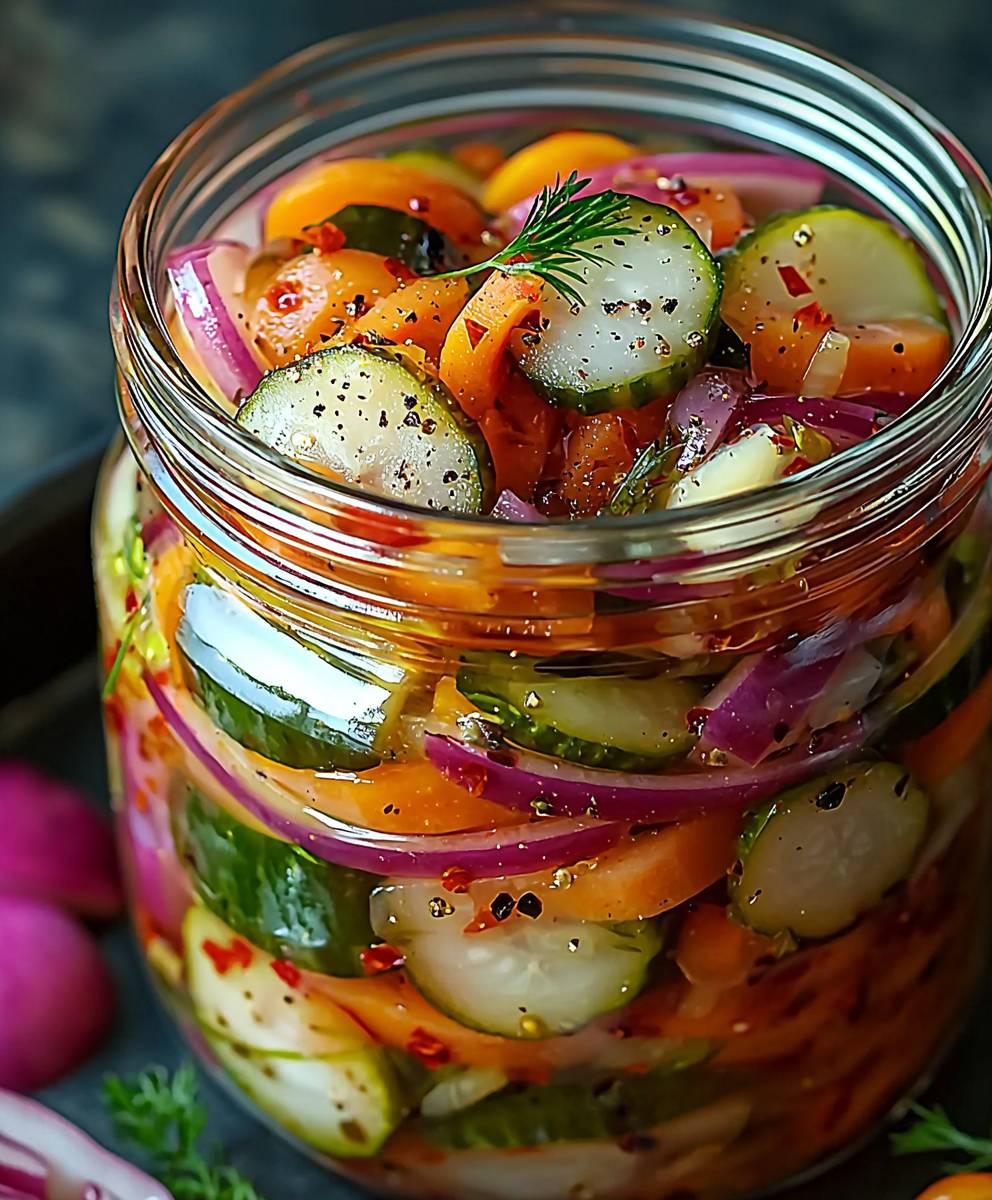
Refrigerator Pickled Vegetables: Craving a tangy, crunchy, and utterly addictive snack that requires minimal effort? Look no further! Imagine crisp cucumbers, vibrant carrots, and sweet bell peppers transformed into a symphony of flavors with a simple brine. This isn’t your grandmother’s canning project; it’s a quick and easy way to enjoy the delightful taste of pickled vegetables without the fuss.
Pickling, in its essence, is an ancient method of food preservation, dating back thousands of years. While traditional methods involve fermentation and canning, our refrigerator version offers a modern twist, allowing you to enjoy the benefits of pickling without the lengthy process. These refrigerator pickled vegetables are a testament to the fact that delicious and healthy food can be both convenient and accessible.
What makes these vegetables so irresistible? It’s the perfect balance of sweet, sour, and salty, combined with the satisfying crunch of fresh produce. They’re incredibly versatile, too! Enjoy them straight from the jar as a healthy snack, add them to salads for a burst of flavor, or use them as a vibrant topping for tacos and sandwiches. The possibilities are endless. Plus, they’re a fantastic way to use up leftover vegetables in your fridge, reducing food waste and adding a healthy boost to your diet. Get ready to experience the joy of homemade pickles, the easy way!

Ingredients:
- 1 large head cauliflower, cut into florets
- 1 red bell pepper, seeded and sliced
- 1 green bell pepper, seeded and sliced
- 1 yellow bell pepper, seeded and sliced
- 1 large red onion, thinly sliced
- 1 cup baby carrots
- 1 cup green beans, trimmed
- 4 cloves garlic, minced
- 2 cups white vinegar (5% acidity)
- 1 cup water
- 1/2 cup granulated sugar
- 2 tablespoons kosher salt
- 1 tablespoon yellow mustard seeds
- 1 teaspoon celery seeds
- 1/2 teaspoon red pepper flakes (optional, for heat)
- 1/4 teaspoon ground turmeric (for color and flavor)
- Fresh dill sprigs (optional, for garnish)
Preparing the Vegetables:
- Wash and Prepare: Thoroughly wash all the vegetables under cold running water. This step is crucial for removing any dirt or debris.
- Cut the Cauliflower: Cut the cauliflower head into small, bite-sized florets. Aim for florets that are roughly the same size to ensure even pickling.
- Slice the Bell Peppers: Remove the stems and seeds from the bell peppers. Slice them into strips that are about 1/4 inch thick. The variety of colors adds visual appeal to the finished product.
- Slice the Red Onion: Peel the red onion and slice it thinly. Slicing it thinly allows the pickling brine to penetrate the onion more effectively, resulting in a milder, less pungent flavor.
- Trim the Green Beans: Trim the ends of the green beans. You can leave them whole or cut them in half, depending on your preference.
- Mince the Garlic: Peel and mince the garlic cloves. Mincing the garlic releases its flavor and aroma, which will infuse the pickling brine.
Making the Pickling Brine:
- Combine Liquids: In a large saucepan, combine the white vinegar and water. Using a 5% acidity white vinegar is essential for proper preservation.
- Add Sugar and Salt: Add the granulated sugar and kosher salt to the saucepan. The sugar balances the acidity of the vinegar, while the salt acts as a preservative and enhances the flavor.
- Add Spices: Add the yellow mustard seeds, celery seeds, red pepper flakes (if using), and ground turmeric to the saucepan. These spices contribute to the overall flavor profile of the pickled vegetables.
- Bring to a Boil: Place the saucepan over medium-high heat and bring the mixture to a boil, stirring occasionally to ensure that the sugar and salt dissolve completely.
- Simmer: Once the mixture comes to a boil, reduce the heat to low and simmer for 5 minutes. This allows the flavors of the spices to meld together.
Packing the Vegetables:
- Prepare Jars: Sterilize your jars and lids. You can do this by boiling them in water for 10 minutes or running them through a dishwasher cycle. Sterilizing the jars helps to prevent spoilage.
- Arrange Vegetables: Pack the prepared vegetables into the sterilized jars. You can arrange them in layers or mix them together, depending on your preference. Be sure to leave about 1/2 inch of headspace at the top of each jar.
- Add Garlic: Distribute the minced garlic evenly among the jars.
- Pour Brine: Carefully pour the hot pickling brine over the vegetables in each jar, ensuring that they are completely submerged. Again, leave about 1/2 inch of headspace.
- Remove Air Bubbles: Use a clean utensil, such as a chopstick or a butter knife, to gently press down on the vegetables and release any trapped air bubbles.
- Wipe Rims: Wipe the rims of the jars with a clean, damp cloth to remove any spills or drips. This ensures a proper seal.
- Seal Jars: Place the lids on the jars and screw on the bands until they are fingertip tight. Do not overtighten the bands, as this can prevent the jars from sealing properly.
Refrigerating and Storing:
- Cool and Refrigerate: Allow the jars to cool completely at room temperature. As they cool, you may hear a popping sound, which indicates that the jars have sealed properly.
- Check for Seal: After the jars have cooled, check the seals by pressing down on the center of each lid. If the lid does not flex or pop back up, it is properly sealed. If a lid flexes, it means the jar did not seal properly and should be refrigerated immediately and consumed within a week.
- Refrigerate: Refrigerate the pickled vegetables for at least 24 hours before serving. This allows the flavors to develop and the vegetables to fully pickle.
- Storage: Properly sealed jars of refrigerator pickled vegetables can be stored in the refrigerator for up to 2 months. Once opened, consume within 2-3 weeks.
Tips and Variations:
- Spice it Up: For a spicier pickle, add more red pepper flakes or a few sliced jalapeños to the jars.
- Sweeten it Up: If you prefer a sweeter pickle, increase the amount of sugar in the brine.
- Add Herbs: Experiment with different herbs, such as fresh dill, thyme, or rosemary, to add unique flavors to your pickled vegetables.
- Other Vegetables: Feel free to add other vegetables to the mix, such as cucumbers, radishes, or pearl onions.
- Vinegar Variations: While white vinegar is the standard, you can experiment with apple cider vinegar or rice vinegar for different flavor profiles. Keep in mind that these vinegars have slightly lower acidity, so you may need to adjust the recipe accordingly.
- Crunchy Pickles: For extra crunchy pickles, consider adding a pinch of calcium chloride (pickle crisp) to each jar before adding the brine.
- Serving Suggestions: Refrigerator pickled vegetables are a delicious and versatile condiment. Serve them as a side dish, add them to salads, or use them as a topping for sandwiches and burgers.
Troubleshooting:
- Soft Pickles: If your pickles are too soft, it could be due to several factors, such as using old vegetables, not using enough vinegar, or not processing the jars properly. Make sure to use fresh, crisp vegetables and follow the recipe carefully.
- Cloudy Brine: A cloudy brine is usually caused by starch from the vegetables. It is harmless and does not affect the safety or flavor of the pickles.
- Mold Growth: If you see any signs of mold growth, discard the pickles immediately. This indicates that the jars were not properly sealed or that the pickles were contaminated.
Enjoy!
I hope you enjoy making and eating these delicious refrigerator pickled vegetables! They are a great way to preserve fresh produce and add a flavorful touch to your meals.
Conclusion:
So, there you have it! This Refrigerator Pickled Vegetables recipe is truly a game-changer. It’s quick, easy, and incredibly versatile, offering a burst of tangy flavor that will elevate your meals and snacks. I genuinely believe this is a must-try recipe for anyone looking to add a healthy and delicious element to their diet without spending hours in the kitchen. The crisp, vibrant vegetables, infused with the zesty brine, are simply irresistible.
Why is this recipe a must-try? Well, beyond the simplicity and speed, it’s the sheer adaptability. You can customize the vegetables to your liking, using whatever is fresh and in season. Think about adding some thinly sliced red onions for a sharper bite, or perhaps some jalapeños for a touch of heat. The possibilities are endless! Plus, unlike traditional canning, there’s no need for special equipment or complicated procedures. It’s a straightforward process that anyone can master, even if you’ve never pickled anything before.
Now, let’s talk about serving suggestions. These pickled vegetables are incredibly versatile. They’re fantastic as a side dish to grilled meats or fish, adding a refreshing counterpoint to richer flavors. I love to add them to salads for an extra layer of texture and tang. They’re also perfect as a topping for tacos or sandwiches, providing a delightful crunch and acidity. And don’t forget about snacking! A jar of these pickled vegetables in the fridge is a lifesaver when you’re craving something healthy and satisfying.
Here are a few variations to get you started:
Spicy Pickled Vegetables:
Add a pinch of red pepper flakes or a sliced jalapeño to the brine for a fiery kick.
Sweet and Sour Pickled Vegetables:
Increase the sugar in the brine slightly and add a splash of rice vinegar for a sweeter, more complex flavor.
Mediterranean Pickled Vegetables:
Include vegetables like artichoke hearts, sun-dried tomatoes, and olives, and add herbs like oregano and thyme to the brine.
Asian-Inspired Pickled Vegetables:
Use rice vinegar, soy sauce, and ginger in the brine, and add vegetables like daikon radish and carrots.
I truly believe that once you try this recipe, you’ll be hooked. It’s a fantastic way to preserve the bounty of your garden or local farmers market, and it’s a delicious and healthy addition to any meal. The best part? You can enjoy the fruits (or vegetables!) of your labor in just a few hours.
So, what are you waiting for? Grab your favorite vegetables, whip up a batch of this easy brine, and get pickling! I’m confident that you’ll love the results. And most importantly, I would absolutely love to hear about your experience. Did you try any variations? What vegetables did you use? What did you serve them with? Share your photos and stories in the comments below! Let’s create a community of pickling enthusiasts and inspire each other with our culinary creations. I can’t wait to see what you come up with! Happy pickling!
Refrigerator Pickled Vegetables: Quick & Easy Guide
Crisp and colorful refrigerator pickled vegetables bursting with tangy flavor. A quick and easy way to preserve your favorite veggies!
Ingredients
- 1 large head cauliflower, cut into florets
- 1 red bell pepper, seeded and sliced
- 1 green bell pepper, seeded and sliced
- 1 yellow bell pepper, seeded and sliced
- 1 large red onion, thinly sliced
- 1 cup baby carrots
- 1 cup green beans, trimmed
- 4 cloves garlic, minced
- 2 cups white vinegar (5% acidity)
- 1 cup water
- 1/2 cup granulated sugar
- 2 tablespoons kosher salt
- 1 tablespoon yellow mustard seeds
- 1 teaspoon celery seeds
- 1/2 teaspoon red pepper flakes (optional, for heat)
- 1/4 teaspoon ground turmeric (for color and flavor)
- Fresh dill sprigs (optional, for garnish)
Instructions
- Wash and Prepare: Thoroughly wash all the vegetables under cold running water.
- Cut the Cauliflower: Cut the cauliflower head into small, bite-sized florets.
- Slice the Bell Peppers: Remove the stems and seeds from the bell peppers. Slice them into strips that are about 1/4 inch thick.
- Slice the Red Onion: Peel the red onion and slice it thinly.
- Trim the Green Beans: Trim the ends of the green beans. You can leave them whole or cut them in half, depending on your preference.
- Mince the Garlic: Peel and mince the garlic cloves.
- Combine Liquids: In a large saucepan, combine the white vinegar and water.
- Add Sugar and Salt: Add the granulated sugar and kosher salt to the saucepan.
- Add Spices: Add the yellow mustard seeds, celery seeds, red pepper flakes (if using), and ground turmeric to the saucepan.
- Bring to a Boil: Place the saucepan over medium-high heat and bring the mixture to a boil, stirring occasionally to ensure that the sugar and salt dissolve completely.
- Simmer: Once the mixture comes to a boil, reduce the heat to low and simmer for 5 minutes.
- Prepare Jars: Sterilize your jars and lids. You can do this by boiling them in water for 10 minutes or running them through a dishwasher cycle.
- Arrange Vegetables: Pack the prepared vegetables into the sterilized jars. Be sure to leave about 1/2 inch of headspace at the top of each jar.
- Add Garlic: Distribute the minced garlic evenly among the jars.
- Pour Brine: Carefully pour the hot pickling brine over the vegetables in each jar, ensuring that they are completely submerged. Again, leave about 1/2 inch of headspace.
- Remove Air Bubbles: Use a clean utensil, such as a chopstick or a butter knife, to gently press down on the vegetables and release any trapped air bubbles.
- Wipe Rims: Wipe the rims of the jars with a clean, damp cloth to remove any spills or drips.
- Seal Jars: Place the lids on the jars and screw on the bands until they are fingertip tight. Do not overtighten the bands, as this can prevent the jars from sealing properly.
- Cool and Refrigerate: Allow the jars to cool completely at room temperature. As they cool, you may hear a popping sound, which indicates that the jars have sealed properly.
- Check for Seal: After the jars have cooled, check the seals by pressing down on the center of each lid. If the lid does not flex or pop back up, it is properly sealed. If a lid flexes, it means the jar did not seal properly and should be refrigerated immediately and consumed within a week.
- Refrigerate: Refrigerate the pickled vegetables for at least 24 hours before serving.
- Storage: Properly sealed jars of refrigerator pickled vegetables can be stored in the refrigerator for up to 2 months. Once opened, consume within 2-3 weeks.
Notes
- Spice it Up: For a spicier pickle, add more red pepper flakes or a few sliced jalapeños to the jars.
- Sweeten it Up: If you prefer a sweeter pickle, increase the amount of sugar in the brine.
- Add Herbs: Experiment with different herbs, such as fresh dill, thyme, or rosemary, to add unique flavors to your pickled vegetables.
- Other Vegetables: Feel free to add other vegetables to the mix, such as cucumbers, radishes, or pearl onions.
- Vinegar Variations: While white vinegar is the standard, you can experiment with apple cider vinegar or rice vinegar for different flavor profiles. Keep in mind that these vinegars have slightly lower acidity, so you may need to adjust the recipe accordingly.
- Crunchy Pickles: For extra crunchy pickles, consider adding a pinch of calcium chloride (pickle crisp) to each jar before adding the brine.
- Serving Suggestions: Refrigerator pickled vegetables are a delicious and versatile condiment. Serve them as a side dish, add them to salads, or use them as a topping for sandwiches and burgers.
- Soft Pickles: If your pickles are too soft, it could be due to several factors, such as using old vegetables, not using enough vinegar, or not processing the jars properly. Make sure to use fresh, crisp vegetables and follow the recipe carefully.
- Cloudy Brine: A cloudy brine is usually caused by starch from the vegetables. It is harmless and does not affect the safety or flavor of the pickles.
- Mold Growth: If you see any signs of mold growth, discard the pickles immediately. This indicates that the jars were not properly sealed or that the pickles were contaminated.


Leave a Comment