

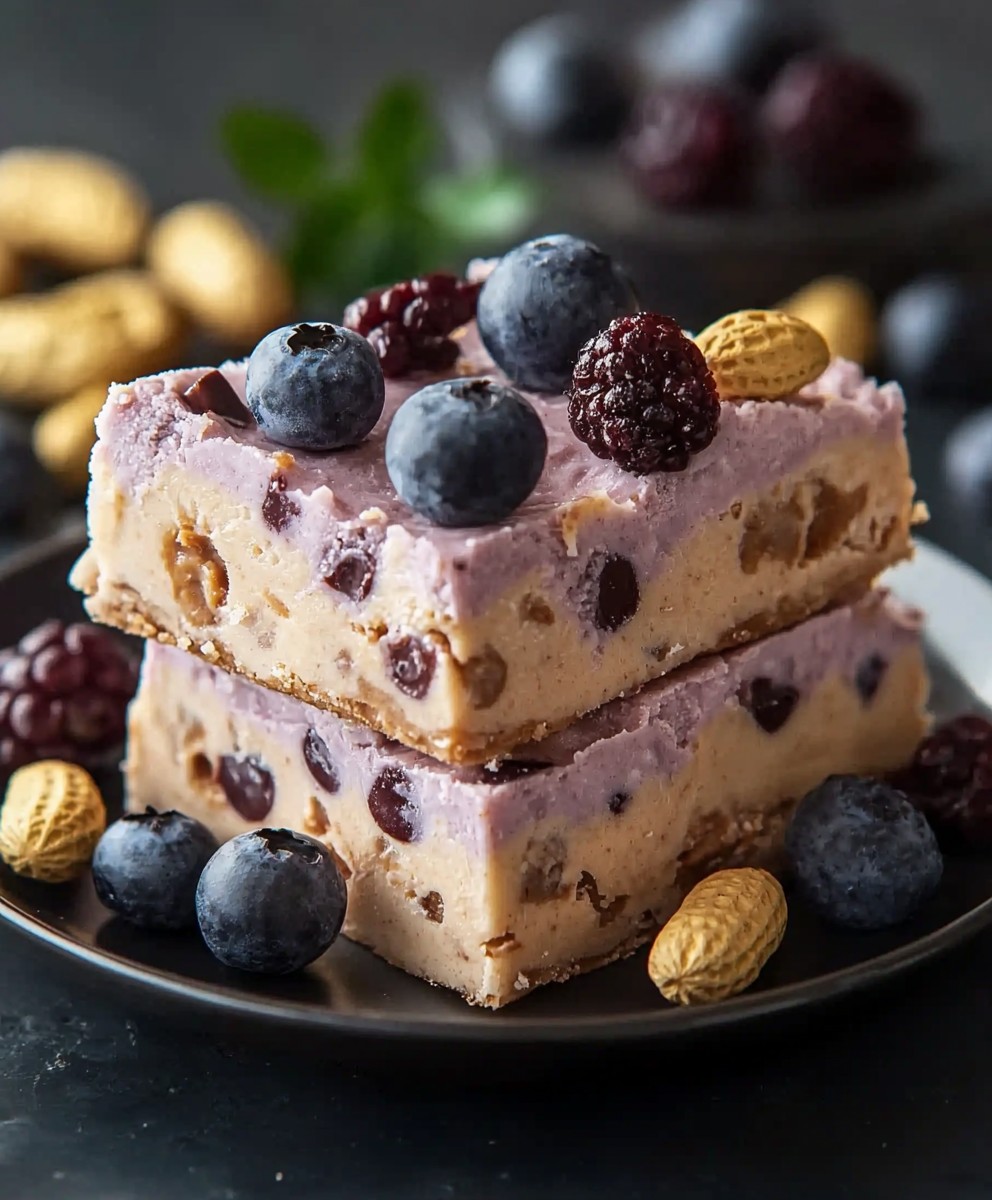
Peanut Butter Yogurt Bars: the ultimate guilt-free indulgence you’ve been searching for! Imagine sinking your teeth into a creamy, dreamy bar that tastes like a decadent dessert but is packed with protein and wholesome goodness. Forget those sugary snacks that leave you feeling sluggish; these bars are here to revolutionize your snacking game.
While the exact origins of combining peanut butter and yogurt into bar form are somewhat modern, the love affair between peanut butter and dairy stretches back decades. Think of the classic peanut butter milkshake or the peanut butter swirl in your favorite ice cream. This recipe simply elevates that beloved combination into a convenient and healthy treat.
What makes these Peanut Butter Yogurt Bars so irresistible? It’s the perfect balance of creamy yogurt, rich peanut butter flavor, and a satisfyingly chewy texture. They’re incredibly easy to make, requiring minimal ingredients and no baking! Plus, they’re completely customizable – add your favorite mix-ins like chocolate chips, granola, or chopped nuts for an extra layer of deliciousness. Whether you’re looking for a quick breakfast, a post-workout snack, or a healthy dessert, these bars are guaranteed to become a new favorite. Get ready to experience a taste sensation that’s both good for you and incredibly satisfying!

Ingredients:
- 1 cup creamy peanut butter (natural or regular)
- 1 cup plain Greek yogurt (full-fat or non-fat)
- 1/2 cup honey or maple syrup (adjust to taste)
- 1 teaspoon vanilla extract
- 1/4 teaspoon salt
- 1 1/2 cups rolled oats (old-fashioned)
- 1/2 cup chopped peanuts (optional, for topping)
- 1/4 cup mini chocolate chips (optional, for topping)
Preparing the Peanut Butter Yogurt Base
Okay, let’s get started! First, we’re going to create the creamy, dreamy base for our bars. This part is super simple, I promise!
- Combine Peanut Butter and Yogurt: In a large mixing bowl, add your 1 cup of creamy peanut butter and 1 cup of plain Greek yogurt. Make sure your peanut butter is nice and smooth for the best texture. If it’s a little stiff, you can microwave it for about 15-20 seconds to soften it up.
- Sweeten the Mixture: Now, pour in your 1/2 cup of honey or maple syrup. I personally love the flavor of honey, but maple syrup adds a lovely depth too. Feel free to adjust the amount to your liking – if you prefer a sweeter bar, add a little more!
- Add Vanilla and Salt: Stir in 1 teaspoon of vanilla extract and 1/4 teaspoon of salt. The vanilla enhances the overall flavor, and the salt helps to balance the sweetness and bring out the peanut butter’s nutty notes. Don’t skip the salt!
- Mix Until Smooth: Using a sturdy spoon or a rubber spatula, mix all the ingredients together until they are completely combined and you have a smooth, creamy mixture. There shouldn’t be any streaks of yogurt or peanut butter. This might take a minute or two, but it’s worth it!
Adding the Oats and Creating the Bar Mixture
Now that we have our delicious peanut butter yogurt base, it’s time to add the oats and transform it into a bar-ready mixture. This is where the texture really comes together!
- Incorporate the Rolled Oats: Add 1 1/2 cups of rolled oats (old-fashioned oats work best) to the peanut butter yogurt mixture. Make sure you’re using rolled oats, not instant oats, as instant oats will make the bars too mushy.
- Mix Thoroughly: Gently fold the oats into the mixture until they are evenly distributed. You want to make sure that all the oats are coated in the peanut butter yogurt mixture. This might take a little bit of effort, but be patient and keep mixing until everything is well combined.
- Check the Consistency: The mixture should be thick and slightly sticky. If it seems too wet, you can add a tablespoon or two more of rolled oats. If it seems too dry, you can add a tablespoon of yogurt or peanut butter. The goal is to have a mixture that holds its shape when pressed together.
Preparing the Pan and Assembling the Bars
Almost there! Now we need to get our pan ready and assemble the bars. This part is all about presentation and making sure the bars are easy to cut later.
- Line the Baking Pan: Line an 8×8 inch baking pan with parchment paper. Make sure the parchment paper overhangs the sides of the pan – this will make it easy to lift the bars out later. You can also use foil if you don’t have parchment paper, but parchment paper is generally easier to work with.
- Press the Mixture into the Pan: Transfer the peanut butter oat mixture to the prepared baking pan. Use a spatula or your hands (lightly dampened to prevent sticking) to press the mixture evenly into the pan. Make sure the surface is smooth and compact. This will help the bars hold together well.
- Add Toppings (Optional): If you’re using toppings, now’s the time to add them! Sprinkle 1/2 cup of chopped peanuts and 1/4 cup of mini chocolate chips evenly over the top of the bars. You can also use other toppings like shredded coconut, dried cranberries, or a drizzle of melted chocolate.
- Gently Press Toppings In: Lightly press the toppings into the surface of the bars so they adhere well. This will prevent them from falling off when you cut the bars later.
Chilling and Cutting the Bars
Patience is key! Chilling the bars is essential for them to set properly and be easy to cut. Trust me, it’s worth the wait!
- Chill in the Refrigerator: Cover the baking pan with plastic wrap or foil and refrigerate for at least 2 hours, or preferably overnight. This allows the bars to firm up and the flavors to meld together. The longer they chill, the easier they will be to cut.
- Cut into Bars: Once the bars are firm, remove them from the refrigerator. Lift the bars out of the pan using the parchment paper overhang. Place them on a cutting board.
- Slice into Desired Size: Use a sharp knife to cut the bars into your desired size. I usually cut them into 16 squares, but you can make them larger or smaller depending on your preference. For clean cuts, you can run the knife under hot water and wipe it dry between each cut.
Storing the Peanut Butter Yogurt Bars
Now that you’ve made these delicious bars, you’ll want to know how to store them properly to keep them fresh and tasty!
- Store in the Refrigerator: Store the cut bars in an airtight container in the refrigerator. They will keep for up to a week. The refrigerator helps to maintain their texture and prevent them from becoming too soft.
- Freezing for Longer Storage: If you want to store the bars for longer, you can freeze them. Wrap each bar individually in plastic wrap or place them in a freezer-safe container. They can be frozen for up to 2 months. Thaw them in the refrigerator before serving.
Tips and Variations
Here are a few extra tips and ideas to customize these peanut butter yogurt bars to your liking:
- Nut Butter Variations: Feel free to experiment with other nut butters, such as almond butter, cashew butter, or sunflower seed butter. Each nut butter will give the bars a slightly different flavor profile.
- Sweetener Options: If you don’t want to use honey or maple syrup, you can try other sweeteners like agave nectar, brown rice syrup, or even a sugar-free sweetener like stevia. Adjust the amount to your desired sweetness level.
- Add-Ins: Get creative with add-ins! You can add dried fruit like raisins, cranberries, or chopped dates. You can also add seeds like chia seeds, flax seeds, or pumpkin seeds for extra nutrients and texture.
- Chocolate Drizzle: For an extra touch of indulgence, drizzle melted chocolate over the top of the bars after they have been chilled. You can use dark chocolate, milk chocolate, or white chocolate.
- Protein Boost: Add a scoop of protein powder to the peanut butter yogurt mixture for an extra protein boost. This is a great way to make these bars a more filling and satisfying snack.
- Vegan Option: To make these bars vegan, use maple syrup or agave nectar instead of honey. Make sure your chocolate chips are also vegan-friendly.
Enjoy!
I hope you enjoy making and eating these peanut butter yogurt bars as much as I do! They’re a healthy, delicious, and easy snack that’s perfect for any time of day. Let me know in the comments if you try them and what variations you come up with!
Conclusion:
And there you have it! These Peanut Butter Yogurt Bars are truly a game-changer. I know, I know, I might be biased, but trust me on this one. The creamy, tangy yogurt perfectly complements the rich, nutty peanut butter, creating a flavor explosion that’s both satisfying and surprisingly healthy. What makes this recipe a must-try? It’s the perfect blend of convenience, taste, and nutritional value. We’re talking minimal ingredients, a simple preparation process, and a snack or dessert that you can feel good about eating.
But the real magic lies in its versatility. These bars are fantastic straight from the freezer, offering a refreshing, almost ice cream-like treat on a hot day. Or, you can let them thaw slightly for a softer, more decadent experience. For a delightful breakfast, crumble a bar over your morning granola or oatmeal. The possibilities are endless!
Looking for some variations? I’ve got you covered! If you’re feeling adventurous, try swirling in a spoonful of your favorite jam or fruit preserves before freezing. Raspberry or strawberry would be particularly delicious with the peanut butter. For a chocolatey twist, add a handful of mini chocolate chips or a drizzle of melted dark chocolate on top. If you want to boost the protein content even further, consider adding a scoop of your favorite protein powder to the yogurt mixture. Just be sure to adjust the sweetness accordingly.
And for those with dietary restrictions, this recipe is easily adaptable. Use a dairy-free yogurt alternative, like coconut or almond yogurt, to make it vegan. You can also substitute the peanut butter with almond butter, cashew butter, or sunflower seed butter for a nut-free option. Just remember that the flavor and texture may vary slightly depending on the substitutions you make.
These Peanut Butter Yogurt Bars are not just a recipe; they’re an invitation to get creative in the kitchen. They’re a blank canvas for your culinary imagination. Don’t be afraid to experiment with different flavors and textures to create your own signature version. I’m confident that you’ll find a combination that you absolutely love.
So, what are you waiting for? Gather your ingredients, preheat your oven (just kidding, no baking required!), and get ready to whip up a batch of these irresistible bars. I promise you won’t regret it. They’re the perfect snack for busy weekdays, a delightful dessert for special occasions, or simply a guilt-free treat to satisfy your sweet tooth.
I’m so excited for you to try this recipe and experience the deliciousness for yourself. Once you’ve made them, I would absolutely love to hear about your experience. Did you make any variations? What did you think of the flavor and texture? Share your photos and comments with me! Let’s spread the word about these amazing Peanut Butter Yogurt Bars and inspire others to get in the kitchen and create something delicious. Happy snacking! I can’t wait to see what you create!
Peanut Butter Yogurt Bars: The Ultimate Healthy Snack Recipe
Easy and healthy no-bake peanut butter yogurt bars packed with oats, perfect for a quick snack or dessert.
Ingredients
- 1 cup creamy peanut butter (natural or regular)
- 1 cup plain Greek yogurt (full-fat or non-fat)
- 1/2 cup honey or maple syrup (adjust to taste)
- 1 teaspoon vanilla extract
- 1/4 teaspoon salt
- 1 1/2 cups rolled oats (old-fashioned)
- 1/2 cup chopped peanuts (optional, for topping)
- 1/4 cup mini chocolate chips (optional, for topping)
Instructions
- Combine Peanut Butter and Yogurt: In a large mixing bowl, add peanut butter and Greek yogurt. Microwave peanut butter for 15-20 seconds if stiff.
- Sweeten the Mixture: Pour in honey or maple syrup, adjusting to taste.
- Add Vanilla and Salt: Stir in vanilla extract and salt.
- Mix Until Smooth: Mix all ingredients until smooth and creamy.
- Incorporate the Rolled Oats: Add rolled oats to the peanut butter yogurt mixture.
- Mix Thoroughly: Gently fold the oats into the mixture until evenly distributed.
- Check the Consistency: The mixture should be thick and slightly sticky. Add more oats if too wet, or yogurt/peanut butter if too dry.
- Line the Baking Pan: Line an 8×8 inch baking pan with parchment paper, ensuring overhang.
- Press the Mixture into the Pan: Transfer the peanut butter oat mixture to the prepared pan. Press evenly into the pan.
- Add Toppings (Optional): Sprinkle chopped peanuts and mini chocolate chips over the top of the bars.
- Gently Press Toppings In: Lightly press the toppings into the surface of the bars.
- Chill in the Refrigerator: Cover the baking pan and refrigerate for at least 2 hours, or preferably overnight.
- Cut into Bars: Lift the bars out of the pan using the parchment paper overhang. Slice into desired size.
- Store in the Refrigerator: Store the cut bars in an airtight container in the refrigerator for up to a week.
- Freezing for Longer Storage: Wrap each bar individually in plastic wrap or place them in a freezer-safe container. They can be frozen for up to 2 months. Thaw them in the refrigerator before serving.
Notes
- For best results, use old-fashioned rolled oats, not instant oats.
- Adjust the amount of honey or maple syrup to your desired sweetness.
- If the mixture seems too wet, add a tablespoon or two more of rolled oats. If it seems too dry, add a tablespoon of yogurt or peanut butter.
- Run the knife under hot water and wipe it dry between each cut for clean cuts.
- Experiment with other nut butters, sweeteners, and add-ins like dried fruit, seeds, or chocolate drizzle.
- For a vegan option, use maple syrup or agave nectar instead of honey and ensure your chocolate chips are vegan-friendly.
- Add a scoop of protein powder for an extra protein boost.
Leave a Comment