
Korean Spring Onion Pancake, or Pajeon, is more than just a savory pancake; it’s a culinary experience that will transport your taste buds straight to the bustling streets of Seoul. Imagine sinking your teeth into a crispy, golden-brown pancake, bursting with the fresh, vibrant flavor of spring onions. Are you ready to discover the secrets to making this iconic dish at home?
Pajeon boasts a rich history, deeply intertwined with Korean culture. Traditionally enjoyed during rainy days, the sizzling sound of the pancake cooking in the pan is said to mimic the sound of raindrops, creating a cozy and comforting atmosphere. It’s a dish often shared amongst family and friends, fostering a sense of togetherness and warmth.
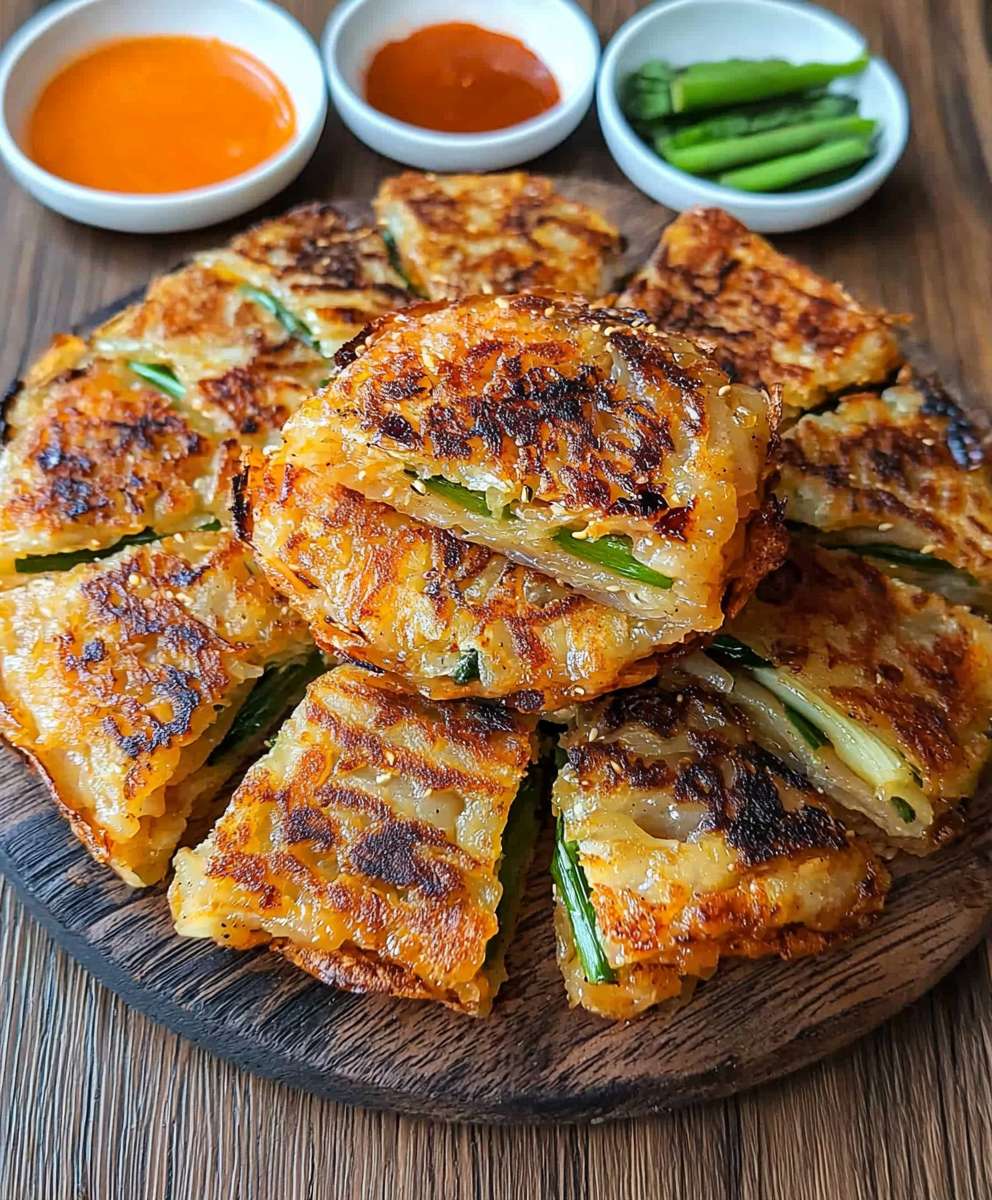
But what makes Korean Spring Onion Pancake so universally loved? It’s the perfect balance of textures – the satisfying crispness of the edges giving way to a soft, chewy interior. The savory batter, infused with the pungent aroma of spring onions, creates an irresistible flavor profile. Plus, it’s incredibly versatile! Enjoy it as a light lunch, a satisfying appetizer, or even a flavorful side dish. This recipe is also surprisingly easy to make, requiring minimal ingredients and effort. So, whether you’re a seasoned chef or a kitchen novice, get ready to impress your loved ones with this authentic and delicious Korean delicacy!

Ingredients:
- For the Pancake Batter:
- 1 cup all-purpose flour
- 1/4 cup rice flour (for extra crispiness, optional)
- 1 teaspoon cornstarch (also for crispiness)
- 1/2 teaspoon salt
- 1/4 teaspoon sugar (optional, enhances flavor)
- 1 cup cold water
- 1 large egg (optional, adds richness)
- For the Filling:
- 1 large bunch of Korean spring onions (pa), about 1 pound, trimmed and cut into 2-3 inch pieces
- 1/2 cup chopped carrots (julienned or finely diced)
- 1/2 cup chopped onion (thinly sliced)
- 1/2 cup seafood mix (optional, shrimp, squid, mussels – thawed if frozen and patted dry)
- 1/4 cup kimchi, chopped (optional, for a spicy kick)
- 1-2 green chili peppers, thinly sliced (optional, for extra heat)
- For the Dipping Sauce:
- 3 tablespoons soy sauce
- 1 tablespoon rice vinegar
- 1 tablespoon water
- 1 teaspoon sesame oil
- 1/2 teaspoon gochugaru (Korean chili flakes, optional)
- 1/2 teaspoon minced garlic
- 1/4 teaspoon sesame seeds
- For Cooking:
- Vegetable oil, for cooking
Preparing the Pancake Batter
- Combine Dry Ingredients: In a large mixing bowl, whisk together the all-purpose flour, rice flour (if using), cornstarch, salt, and sugar (if using). Make sure there are no lumps. This ensures a smooth batter.
- Add Wet Ingredients: Gradually pour in the cold water while whisking continuously. If you’re using an egg, add it now and whisk until just combined. Be careful not to overmix the batter, as this can develop the gluten in the flour and make the pancake tough. A few small lumps are okay.
- Rest the Batter: Cover the bowl with plastic wrap and let the batter rest in the refrigerator for at least 30 minutes, or even up to a few hours. This allows the gluten to relax, resulting in a more tender pancake. Resting the batter is a crucial step for achieving the right texture.
Preparing the Filling
- Prepare the Spring Onions: Wash the Korean spring onions (pa) thoroughly. Trim off the roots and any wilted or damaged parts. Cut the spring onions into 2-3 inch pieces. The length is important for even cooking and a good bite.
- Prepare Other Vegetables: Chop the carrots into julienned strips or finely dice them. Thinly slice the onion. If you’re using kimchi, chop it into small pieces. If you want to add some heat, thinly slice the green chili peppers.
- Prepare Seafood (Optional): If you’re using seafood, make sure it’s thawed completely if frozen. Pat it dry with paper towels to remove excess moisture. Cut larger pieces of seafood into smaller, bite-sized pieces. Excess moisture will prevent the pancake from getting crispy.
- Combine Filling Ingredients: In a separate bowl, gently combine the prepared spring onions, carrots, onion, seafood (if using), kimchi (if using), and green chili peppers (if using). Don’t overmix at this stage.
Cooking the Pancake
- Heat the Pan: Heat a large non-stick skillet or griddle over medium heat. Add about 2-3 tablespoons of vegetable oil to the pan. Make sure the oil is evenly distributed and the pan is hot before adding the batter. The oil should shimmer slightly.
- Pour the Batter: Give the batter a quick stir. Pour about half of the batter into the hot pan, spreading it out evenly to form a thin circle, about 10-12 inches in diameter. You want a thin pancake, not a thick one.
- Add the Filling: Immediately sprinkle half of the prepared filling evenly over the batter in the pan. Gently press the filling into the batter with a spatula to help it adhere. This prevents the filling from falling out when you flip the pancake.
- Cook the First Side: Cook the pancake for about 5-7 minutes, or until the bottom is golden brown and crispy. Use a spatula to carefully lift the edge of the pancake to check the color. Be patient and don’t try to flip it too early, or it will fall apart.
- Flip the Pancake: Carefully flip the pancake using a large spatula or two spatulas. If the pancake is sticking to the pan, add a little more oil around the edges.
- Cook the Second Side: Cook the second side for another 5-7 minutes, or until it is golden brown and crispy. Again, check the color periodically. You may need to add more oil to the pan if it seems dry.
- Repeat: Remove the cooked pancake from the pan and place it on a cutting board. Repeat the process with the remaining batter and filling. Add more oil to the pan as needed.
Making the Dipping Sauce
- Combine Ingredients: In a small bowl, whisk together the soy sauce, rice vinegar, water, sesame oil, gochugaru (if using), minced garlic, and sesame seeds.
- Taste and Adjust: Taste the dipping sauce and adjust the ingredients to your liking. You can add more soy sauce for saltiness, rice vinegar for tanginess, or gochugaru for spiciness.
Serving the Pancake
- Cut the Pancake: Use a pizza cutter or a sharp knife to cut the pancake into wedges.
- Serve Immediately: Serve the Korean spring onion pancake hot and crispy with the dipping sauce on the side. It’s best enjoyed fresh!
Tips for the Best Korean Spring Onion Pancake
- Use Cold Water: Using cold water in the batter helps to prevent the gluten from developing too much, resulting in a more tender pancake.
- Don’t Overmix the Batter: Overmixing the batter will make the pancake tough. Mix until just combined.
- Rest the Batter: Resting the batter allows the gluten to relax, resulting in a more tender pancake.
- Use a Non-Stick Pan: A non-stick pan is essential for preventing the pancake from sticking and making it easier to flip.
- Don’t Overcrowd the Pan: Cook the pancakes one at a time to ensure they cook evenly and get crispy.
- Adjust the Filling to Your Liking: Feel free to add or substitute ingredients in the filling to suit your taste. You can add different types of vegetables, seafood, or meat.
- Make it Spicy: Add more gochugaru or green chili peppers to the filling or dipping sauce for a spicier pancake.
- Get Creative with the Dipping Sauce: Experiment with different ingredients in the dipping sauce to find your favorite flavor combination.
- Serve Immediately: Korean spring onion pancakes are best enjoyed hot and crispy.
- Crispy Edges: To get extra crispy edges, you can drizzle a little extra oil around the edges of the pancake while it’s cooking.
- Even Cooking: Make sure the heat is consistent and not too high, or the pancake will burn before it’s cooked through.
- Press the Filling: Gently pressing the filling into the batter helps it adhere and prevents it from falling out when you flip the pancake.
Variations
- Kimchi Pancake (Kimchijeon): Add more kimchi to the filling for a spicier and more flavorful pancake.
- Seafood Pancake (Haemul Pajeon): Use a variety of seafood, such as shrimp, squid, and mussels, in the filling.
- Meat Pancake: Add thinly sliced beef or pork to the filling.
- Vegetarian Pancake: Omit the seafood or meat and add more vegetables, such as mushrooms, zucchini, or bell peppers.
- Cheese Pancake: Sprinkle some shredded cheese over the filling before cooking.
Storage and Reheating
Leftover Korean spring onion pancakes can be stored in the refrigerator for up to 2 days. To reheat, you can pan-fry them in a little oil until heated through and crispy, or you can microwave them, although they
Conclusion:
This isn’t just another pancake recipe; it’s an invitation to experience the vibrant flavors of Korea right in your own kitchen. The crispy edges, the savory spring onions, and the satisfying chewiness all combine to create a truly unforgettable culinary experience. I truly believe this Korean spring onion pancake recipe is a must-try for anyone looking to expand their palate and impress their friends and family.
But what makes this recipe so special? It’s the perfect balance of simplicity and flavor. The ingredients are readily available, the instructions are straightforward, and the end result is a dish that’s both comforting and exciting. It’s a fantastic appetizer, a light lunch, or even a unique side dish to accompany your favorite Korean BBQ.
And the best part? It’s incredibly versatile! Feel free to experiment with different variations to suit your own taste. Add a sprinkle of kimchi for a spicy kick, incorporate some shredded carrots for extra sweetness, or even throw in some cooked shrimp or squid for a heartier pancake. For a vegetarian option, consider adding some finely chopped mushrooms or zucchini. The possibilities are endless!
Serving suggestions? Oh, where do I even begin? Traditionally, these pancakes are served with a simple dipping sauce made from soy sauce, rice vinegar, sesame oil, and a pinch of gochugaru (Korean chili flakes). But don’t be afraid to get creative! A drizzle of sriracha mayo adds a creamy, spicy element, while a side of kimchi provides a tangy and refreshing contrast. I personally love serving them with a side of quick pickled cucumbers for a bright and crunchy accompaniment.
For a complete meal, pair these pancakes with a bowl of spicy ramen or a hearty Korean stew. They’re also delicious alongside grilled meats or tofu. And if you happen to have any leftovers (though I highly doubt you will!), they’re fantastic reheated in a pan or even enjoyed cold straight from the fridge.
I’ve poured my heart and soul into perfecting this recipe, and I’m confident that you’ll love it as much as I do. It’s a dish that’s guaranteed to bring a smile to your face and a burst of flavor to your taste buds.
So, what are you waiting for? Gather your ingredients, put on some upbeat music, and get ready to embark on a culinary adventure. I promise you won’t be disappointed. This Korean spring onion pancake recipe is more than just a recipe; it’s an experience.
Once you’ve tried it, I’d absolutely love to hear about your experience! Did you make any variations? What did you serve it with? What did your family and friends think? Share your photos and stories in the comments below. I’m always eager to learn from my readers and see how they’ve put their own spin on my recipes. Your feedback is invaluable and helps me continue to create delicious and inspiring content. Happy cooking, and enjoy every single bite! I can’t wait to hear all about your delicious creations!
Korean Spring Onion Pancake: A Delicious & Easy Recipe
Savory Korean Spring Onion Pancakes (Pajeon) filled with vibrant spring onions, vegetables, and optional seafood, served with a flavorful dipping sauce. Crispy, delicious, and easy to customize!
Ingredients
- 1 cup all-purpose flour
- 1/4 cup rice flour (optional, for extra crispiness)
- 1 teaspoon cornstarch
- 1/2 teaspoon salt
- 1/4 teaspoon sugar (optional)
- 1 cup cold water
- 1 large egg (optional)
- 1 large bunch of Korean spring onions (pa), about 1 pound, trimmed and cut into 2-3 inch pieces
- 1/2 cup chopped carrots (julienned or finely diced)
- 1/2 cup chopped onion (thinly sliced)
- 1/2 cup seafood mix (optional, shrimp, squid, mussels – thawed if frozen and patted dry)
- 1/4 cup kimchi, chopped (optional)
- 1-2 green chili peppers, thinly sliced (optional)
- 3 tablespoons soy sauce
- 1 tablespoon rice vinegar
- 1 tablespoon water
- 1 teaspoon sesame oil
- 1/2 teaspoon gochugaru (Korean chili flakes, optional)
- 1/2 teaspoon minced garlic
- 1/4 teaspoon sesame seeds
- Vegetable oil, for cooking
Instructions
- Prepare the Pancake Batter: In a large bowl, whisk together all-purpose flour, rice flour (if using), cornstarch, salt, and sugar (if using). Gradually add cold water while whisking. If using an egg, add it now. Mix until just combined. Don’t overmix. Cover and refrigerate for at least 30 minutes.
- Prepare the Filling: Wash and trim spring onions, then cut into 2-3 inch pieces. Chop carrots, slice onion, and chop kimchi (if using). If using seafood, thaw and pat dry, then cut into bite-sized pieces. Combine spring onions, carrots, onion, seafood (if using), kimchi (if using), and green chili peppers (if using) in a separate bowl.
- Make the Dipping Sauce: In a small bowl, whisk together soy sauce, rice vinegar, water, sesame oil, gochugaru (if using), minced garlic, and sesame seeds. Taste and adjust as needed.
- Cook the Pancake: Heat a large non-stick skillet over medium heat with 2-3 tablespoons of vegetable oil. Stir the batter. Pour half the batter into the pan, spreading it into a thin circle. Sprinkle half the filling evenly over the batter and gently press it in.
- Cook the First Side: Cook for 5-7 minutes, until golden brown and crispy.
- Flip and Cook the Second Side: Carefully flip the pancake and cook for another 5-7 minutes, until golden brown and crispy. Add more oil if needed.
- Repeat: Remove the cooked pancake and repeat with the remaining batter and filling.
- Serve: Cut the pancake into wedges and serve hot with the dipping sauce.
Notes
- Use cold water for a tender pancake.
- Don’t overmix the batter.
- Resting the batter is crucial.
- A non-stick pan is essential.
- Adjust the filling to your liking.
- Add more gochugaru or green chili peppers for a spicier pancake.
- Serve immediately for the best crispy texture.
- Drizzle extra oil around the edges for extra crispy edges.
- Make sure the heat is consistent and not too high.
- Gently press the filling into the batter to help it adhere.
Leave a Comment